For the longest time, I believed the only “proper” way to bake sourdough was inside a heavy Dutch oven.
Every sourdough video I watched showed someone preheating a massive cast-iron pot, carefully lowering the dough into it, replacing the scorching hot lid, and repeating the whole process for the second loaf. So naturally, I did exactly the same.
It worked.
The bread looked beautiful, the crust was crackly, and the oven spring was impressive.
But if I’m being completely honest, I never enjoyed the process.
Lifting a blazing hot Dutch oven in and out of the oven made me nervous every single bake. I worried about burning my hands, dropping the dough, or accidentally touching the sides of the pot. Baking two loaves meant waiting for the Dutch oven to cool slightly or owning a second heavy pot, which wasn’t exactly practical.
Everything changed after I experimented with two ordinary metal loaf pans.
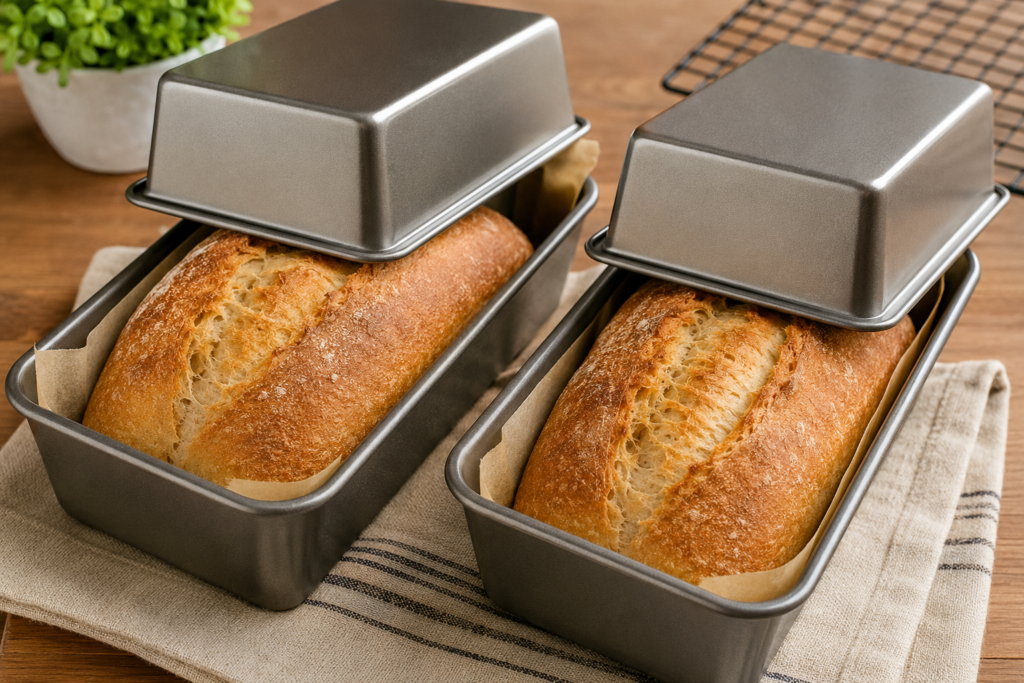
One pan held the dough, while the second pan sat upside down on top, trapping steam just like a Dutch oven.
I wasn’t expecting much.
Instead, I ended up with beautifully risen loaves, a gorgeous golden crust, and a baking routine that felt far less stressful.
Now it’s the method I use most often.
If you mainly bake bread for sandwiches, toast, or everyday family meals, this approach is surprisingly practical.
Why I Switched from a Dutch Oven
A Dutch oven is fantastic, but it isn’t perfect for every baker.
Here are the biggest problems I kept running into:
- The pot weighs a lot.
- It’s awkward to handle when fully heated.
- Loading high-hydration dough safely isn’t easy.
- Baking multiple loaves takes longer.
- Good Dutch ovens can be expensive.
Using two loaf pans solved almost every one of those problems.
The top pan traps moisture released by the dough during the first part of baking. That steam helps delay crust formation so the loaf can expand properly before the crust hardens.
The result is surprisingly close to Dutch oven baking, especially for sandwich-style sourdough.
Why This Method Works
The first 20 to 25 minutes of baking are the most important.
During this stage, sourdough needs plenty of steam.
Steam keeps the outside of the dough flexible so it can continue expanding. Once the loaf has reached its full height, the crust begins setting and develops that rich golden color everyone loves.
Normally, a Dutch oven traps this moisture.
Using another loaf pan upside down does exactly the same thing.
The dough creates its own steam naturally, and the cover keeps it around the loaf until it’s no longer needed.
It’s a wonderfully simple solution.
Ingredients
This recipe makes 2 medium sourdough loaves.
Main Dough
- 200 g active sourdough starter
- 700 g water
- 1,000 g bread flour
- 20 g fine sea salt
Optional (For a Softer Sandwich Loaf)
- 20 g honey
- 20 g olive oil
Your starter should be active, bubbly, and recently fed.
A healthy starter should smell pleasantly tangy rather than overly sour.
Bread flour gives the best oven spring and structure, although all-purpose flour works too. If using all-purpose flour, you may need to reduce the water slightly depending on your flour.
Equipment You’ll Need
One thing I appreciate about this method is that it doesn’t require expensive baking gear.
You’ll need:
- Two metal loaf pans
- Two additional loaf pans to use as covers
- Large mixing bowl
- Dough scraper
- Kitchen scale
- Parchment paper
- Sharp bread lame or razor blade
- Cooling rack
That’s it.
Step-by-Step Instructions
Step 1: Mix the Dough
In a large bowl, combine the active sourdough starter with the water.
Stir until the starter mostly dissolves.
Add the flour and mix until no dry flour remains.
The dough will look rough and shaggy.
Don’t worry—that’s completely normal.
Cover the bowl and let it rest for 30 minutes.
This short rest hydrates the flour and makes the dough easier to develop later.
Step 2: Add the Salt
Sprinkle the salt over the dough.
If you’re adding honey or olive oil, mix them in now.
Work everything into the dough using wet hands until evenly combined.
The dough will initially feel sticky but becomes smoother as gluten develops.
Step 3: Stretch and Fold
Instead of kneading aggressively, perform stretch-and-folds.
Every 30 minutes over the next two hours:
- Lift one side of the dough.
- Stretch gently upward.
- Fold it back over itself.
- Rotate the bowl.
- Repeat on all four sides.
Complete 3 to 4 sets.
You’ll notice the dough becoming stronger after each round.
Step 4: Bulk Fermentation
Leave the dough at room temperature.
Depending on your kitchen temperature, this usually takes 4 to 6 hours.
You’re looking for dough that has:
- Expanded noticeably
- Looks airy
- Feels lighter
- Jiggles slightly when the bowl is moved
Don’t focus only on the clock.
The dough always tells you when it’s ready.
Step 5: Divide and Shape
Turn the dough onto a lightly floured counter.
Divide it into two equal pieces.
Shape each into a tight loaf.
Creating gentle surface tension helps produce better oven spring.
Step 6: Prepare the Loaf Pans
Line both loaf pans with parchment paper.
Transfer one loaf into each pan.
Cover and proof.
You have two options:
Same-day bake
Allow the dough to rise until noticeably puffy.
Overnight proof
Cover the pans and refrigerate overnight.
Cold proofing develops more flavor while making scoring much easier.
Step 7: Score the Dough
Preheat your oven to 450°F (232°C).
Use a bread lame or razor blade to score each loaf.
One long slash works perfectly.
Step 8: Cover with the Second Pan
Place another loaf pan upside down over each loaf.
This creates a simple enclosed baking chamber.
It traps steam naturally without requiring a Dutch oven.
Step 9: Bake
Bake covered for 25 minutes.
Carefully remove the top pans.
Watch out for the escaping steam.
Continue baking uncovered for another 15 to 20 minutes until the crust becomes beautifully golden brown.
Step 10: Cool Completely
Remove the bread from the pans immediately.
Cool on a wire rack.
As tempting as it is, don’t slice while it’s hot.
Fresh sourdough continues setting internally as it cools.
Cutting too early often leaves the crumb gummy.
Waiting is worth it.
Baking Temperature and Timing
I’ve tested slightly lower temperatures, but 450°F consistently gives the best rise.
Here’s the schedule that works well:
- Preheat oven to 450°F
- Bake covered: 25 minutes
- Bake uncovered: 15–20 minutes
If you enjoy a softer crust, remove the bread once it reaches a deep golden color.
If you prefer a darker artisan crust, leave it in for another 3 to 5 minutes.
A finished loaf should:
- Sound hollow when tapped
- Feel surprisingly light
- Reach an internal temperature of 205–210°F
What I Noticed Compared with a Dutch Oven
After several bakes, I started seeing consistent differences.
Crust
The crust is slightly softer than Dutch oven bread.
Personally, I actually prefer it because it’s easier to slice and makes fantastic sandwiches.
Shape
Loaves bake into a more even sandwich shape.
No oversized ears or dramatic artisan domes—just practical, evenly shaped bread.
Oven Spring
Still excellent.
The trapped steam gives the dough enough time to expand before the crust firms up.
Convenience
This is where the loaf-pan method really shines.
No lifting heavy cast iron.
No awkward transfers.
No worrying about accidentally burning yourself.
Tips for the Best Results
A few small adjustments made a noticeable difference in my own baking.
- Use metal loaf pans whenever possible.
- Line the pans with parchment paper.
- Make sure the top pan doesn’t touch the dough before baking.
- Use a healthy, active starter.
- Don’t rush fermentation.
- Let the bread cool completely before slicing.
These simple habits improve consistency every time.
Common Mistakes to Avoid
Using an Underfed Starter
Weak starter means weak rise.
Feed it well and bake when it’s at peak activity.
Removing the Cover Too Early
Steam is critical during the first part of baking.
Keep the loaf covered for the full 25 minutes.
Overproofing
If the dough rises too long before baking, it can lose strength and spread rather than rise.
Watch the dough instead of the clock.
Cutting While Hot
Fresh bread smells incredible.
I know it’s hard to wait.
But slicing early often ruins the texture inside.
Storage Tips
Once completely cool:
- Store in a bread bag or paper bag for up to 3 days.
- Freeze sliced bread for longer storage.
- Toast directly from frozen whenever needed.
This method produces excellent everyday bread that freezes beautifully.
Nutrition Information
Serving Size: 1 slice
- Calories: 167
- Carbohydrates: 35 g
- Protein: 5.5 g
- Fat: 0.7 g
- Saturated Fat: 0.1 g
- Unsaturated Fat: 0.6 g
- Trans Fat: 0 g
- Fiber: 1.2 g
- Sugar: 0.2 g
- Sodium: 328 mg
- Cholesterol: 0 mg
Nutrition values are approximate and may vary depending on ingredient brands and loaf size.
Frequently Asked Questions
Can I use glass loaf pans?
Yes, but metal pans generally produce better browning and more even baking. If using glass, you may need to bake a few minutes longer.
Can I refrigerate the dough overnight?
Absolutely. An overnight cold proof improves flavor, makes scoring easier, and fits nicely into a busy schedule.
Do I need bread flour?
Bread flour gives the best structure, but all-purpose flour can still produce excellent bread. You may simply need to reduce the water slightly.
Why use a second loaf pan instead of foil?
A metal loaf pan creates a more stable enclosed environment that traps steam effectively without touching the dough. It’s also reusable and much sturdier than foil.
Is the crust as crispy as Dutch oven bread?
It’s slightly softer, which many people actually prefer for toast and sandwiches. The bread still develops a beautiful golden crust with excellent flavor.
Final Thoughts
After dozens of sourdough bakes, I’ve realized that great bread doesn’t always require expensive equipment or complicated techniques.
The two-loaf-pan method has made baking simpler, safer, and much more enjoyable. I can bake two loaves at once, skip wrestling with heavy cast iron, and still pull beautiful homemade sourdough from the oven.
If you’ve been avoiding sourdough because you don’t own a Dutch oven—or you’re simply tired of lifting one every bake—give this method a try. You might be surprised how quickly it becomes your new favorite way to bake.