
There was a time when I thought English muffins were just one of those things you grabbed from the grocery store and tossed into the toaster without much thought. They were fine, but nothing special.
Then I started baking with sourdough.
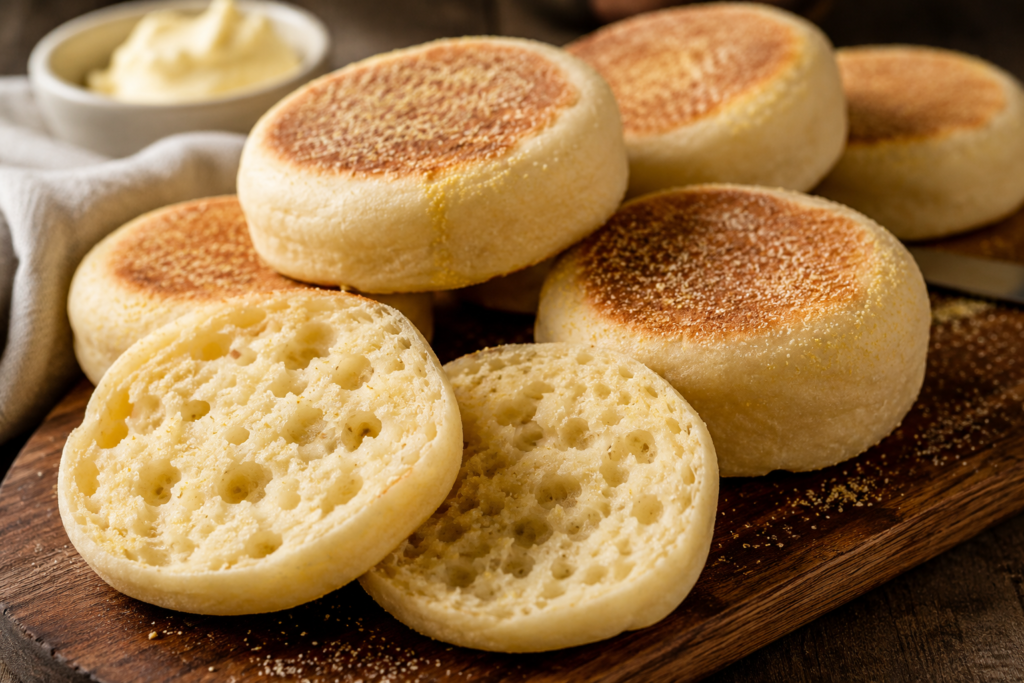
One weekend, I decided to use some active starter to make English muffins instead of another loaf of bread. The first batch completely changed my expectations. When I split one open with a fork, it was packed with those famous nooks and crannies that soaked up melted butter like a sponge. The flavor was lightly tangy, slightly sweet, and miles ahead of anything I’d bought from a store.
Since then, these sourdough English muffins have become a regular part of my baking routine. They’re perfect for breakfast sandwiches, quick snacks, or simply toasted and covered in butter.
If you’ve got an active sourdough starter, you’re going to love these.
Why You’ll Love These Sourdough English Muffins
- Soft and fluffy inside
- Golden, lightly crisp exterior
- Full of classic nooks and crannies
- Naturally fermented sourdough flavor
- Perfect for breakfast sandwiches
- Freezer-friendly and easy to make ahead
Time Breakdown
- Prep Time: 20 minutes
- Rest Time: 3–4 hours
- Cook Time: 20 minutes
- Total Time: Approximately 4 hours 20 minutes
Overnight Option: Refrigerate the dough overnight after mixing for deeper flavor and more flexibility.
Ingredients
Main Dough
- 1 cup active sourdough starter (225 g)
- ¾ cup warm water (180 ml)
- 1 cup warm milk (240 ml)
- 5 cups all-purpose or bread flour (600 g)
- ¼ cup olive oil (60 ml)
- ¼ cup honey (85 g)
- 2 tsp salt (10–12 g)
For Dusting
- Cornmeal (30–50 g, as needed)
How to Make Sourdough English Muffins
Step 1: Build the Base Dough
In a large mixing bowl, combine:
- 225 g active sourdough starter
- 180 ml warm water
- 240 ml warm milk
- 240 g flour (about 2 cups)
Mix until everything comes together into a thick, shaggy batter.
Cover the bowl and let it rest for 30 minutes. This resting period helps hydrate the flour and improves the final texture.
Step 2: Bring the Dough Together
Add:
- 85 g honey
- 60 ml olive oil
- 10–12 g salt
Gradually mix in the remaining 360 g flour (about 3 cups), adding it a little at a time until a soft dough forms.
Knead for 3–5 minutes until the dough becomes smooth, elastic, and slightly springy.
If the dough feels slightly tacky, that’s perfectly normal.
Step 3: First Rise
Lightly oil a bowl and place the dough inside.
Cover and let rise in a warm spot for 1 hour.
Sourdough works more slowly than commercial yeast, so don’t worry if the rise seems gradual.
Step 4: Stretch and Fold
After the first rise, perform a stretch-and-fold.
Grab one side of the dough, stretch it upward, and fold it into the center.
Rotate the bowl and repeat around all sides.
Cover and let the dough rest for another hour.
Repeat this stretch-and-fold process one more time.
This simple technique helps build structure and creates a lighter texture.
Step 5: Final Rise
Allow the dough to rise for about 1½ hours, or until doubled in size.
If your kitchen is cool, it may need extra time.
One thing I’ve learned from making sourdough regularly is that the dough doesn’t care about the clock. Watch the dough, not the timer.
Step 6: Shape the Muffins
Dust your work surface generously with flour and cornmeal.
Roll the dough to about ½-inch (1.25 cm) thickness.
Using a biscuit cutter or drinking glass, cut out rounds.
Place the rounds on a cornmeal-dusted tray.
Gather scraps, gently re-roll, and cut additional muffins.
You should get approximately 20–24 muffins depending on the size of your cutter.
Step 7: Cook on the Griddle
Preheat a griddle or heavy skillet to 350–375°F (175–190°C) over medium heat.
Place the muffins onto the hot surface.
Cook for:
- 4–5 minutes on the first side
- Flip carefully
- Cook another 3–4 minutes on the second side
Press lightly with a spatula after flipping to encourage even browning.
Flip additional times if necessary until the centers are fully cooked.
The muffins should be golden brown and lightly crisp outside while remaining soft inside.
Step 8: Cool Completely
Transfer the muffins to a wire rack.
Allow them to cool completely before opening.
This step is important because the interior continues setting while cooling.
Resist the temptation to cut into one immediately.
How to Get Those Famous Nooks and Crannies
For authentic English muffin texture, don’t slice them with a knife.
Instead, use a fork to pierce around the edges and gently pull them apart.
This preserves the airy interior and creates the classic nooks and crannies that hold butter, jam, and other toppings beautifully.
Serving Ideas
Classic Butter and Toast
A warm toasted muffin with butter is hard to beat.
Breakfast Sandwich
Fill with:
- Fried egg
- Cheddar cheese
- Crispy bacon
- Ham or sausage
Peanut Butter and Honey
A simple but incredibly satisfying breakfast.
Cream Cheese and Jam
Perfect when you’re craving something sweet.
Ham and Cheddar Melt
An easy lunch option that feels bakery-quality.
Storage Tips
Room Temperature
Store in an airtight container for 3–4 days.
Refrigerator
Keeps fresh for up to 1 week.
Freezer
Freeze for up to 2 months.
For convenience, split the muffins before freezing so they’re ready for the toaster.
Pro Tips for Bakery-Style Results
- Use an active, bubbly starter that has recently doubled in size.
- Don’t rush fermentation. Time creates flavor.
- Cornmeal is essential for the traditional texture.
- Cook over medium heat for even baking.
- Let muffins cool completely before opening.
- Use a fork rather than a knife for the best nooks and crannies.
- Overnight fermentation produces even better flavor.
Frequently Asked Questions
Why are my English muffins dense?
Dense muffins are usually caused by under-proofing or an inactive starter. Give the dough more time to rise and make sure your starter is healthy before baking.
Can I skip the honey?
Yes. The muffins will still turn out well, but they’ll lose a little sweetness and softness.
Can I bake them instead of using a griddle?
You can, but the texture won’t be quite the same. Traditional English muffins develop their signature crust and crumb on a griddle.
Why use cornmeal?
Cornmeal prevents sticking and gives the muffins their classic bakery-style bottom texture.
Can I make the dough overnight?
Absolutely. Refrigerating the dough overnight often produces even better flavor and makes the recipe easier to fit into your schedule.
Final Thoughts
These sourdough English muffins are the kind of recipe that quietly ruins store-bought versions forever. They have a beautifully golden crust, a soft and chewy interior, and those irresistible nooks and crannies that seem designed specifically for melted butter.
Whether you’re building a loaded breakfast sandwich or simply enjoying one with butter and jam, they’re worth every minute of the process. Once you make a batch from scratch, you’ll understand why so many home bakers keep coming back to this recipe again and again.