Recipe Description
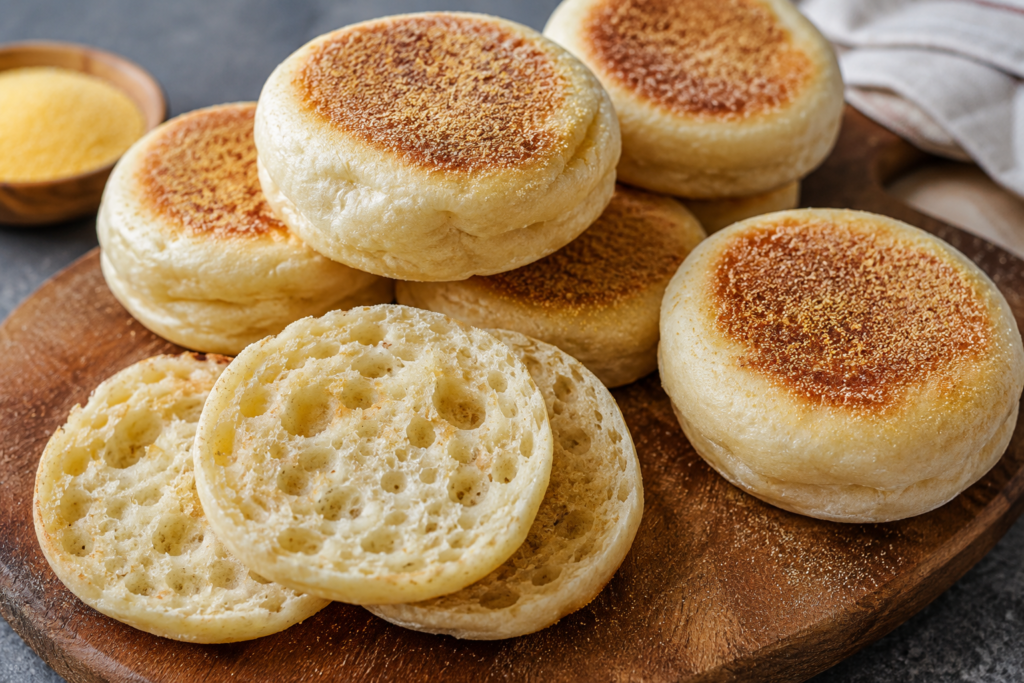
These Homemade Sourdough English Muffins are soft, chewy, and naturally fermented with an active sourdough starter for incredible flavor. Cooked on a skillet instead of baked, they develop a lightly crisp, golden crust while staying tender inside with the classic nooks and crannies that are perfect for holding melted butter, jam, or honey. Made with simple pantry ingredients like bread flour, warm milk, and honey, they’re an easy make-ahead breakfast that freezes beautifully and toasts perfectly for busy mornings. Whether you’re serving them with eggs, turning them into breakfast sandwiches, or enjoying one with your favorite spread, these homemade English muffins are a delicious upgrade from the store-bought version.Storage & Freezing
Store completely cooled English muffins in an airtight container at room temperature for up to 3 days.
For longer storage, place them in a freezer-safe bag and freeze for up to 3 months. Splitting the muffins before freezing makes it easy to toast them straight from the freezer without thawing.
Nutrition Information (Approximate Per Muffin)
- Calories: 185 kcal
- Protein: 6 g
- Carbohydrates: 36 g
- Fat: 1.5 g
- Saturated Fat: 0.5 g
- Fiber: 1.5 g
- Sugar: 3 g
- Sodium: 220 mg
- Cholesterol: 3 mg
Nutrition values are estimates and may vary depending on the exact ingredients used.
Ingredients
This recipe makes 18 homemade sourdough English muffins.
| Ingredient | Metric | US Measure |
|---|---|---|
| Active sourdough starter (100% hydration) | 200g | ¾ cup + 2 tablespoons |
| Warm whole milk | 480g | 2 cups |
| Honey | 42g | 2 tablespoons |
| Bread flour | 720g | About 6 cups |
| Fine sea salt | 10g | 1¾ teaspoons |
| Cornmeal (for dusting) | 40–50g | About ⅓ cup |
| Extra flour (for shaping) | As needed | 2–3 tablespoons |
Ingredient Notes
- Active sourdough starter: Feed your starter 4 to 6 hours before mixing. It should be bubbly, airy, and at its peak for the best rise.
- Warm milk: Heat the milk until it feels warm to the touch (95–100°F / 35–38°C). Avoid hot milk because it can slow down or damage the starter.
- Bread flour: The higher protein content creates the chewy texture that makes English muffins so good.
- Honey: Adds a mild sweetness while helping the muffins brown beautifully during cooking.
- Cornmeal: Gives the classic English muffin appearance and prevents sticking.
Step-by-Step Instructions
Step 1 – Mix the Dough
In a large mixing bowl, combine the 200g active sourdough starter, 480g warm milk, and 42g honey. Stir until the starter is mostly dissolved.
Add the 720g bread flour and 10g salt. Mix with a wooden spoon or dough whisk until no dry flour remains. The dough will look rough and shaggy, which is completely normal.
Cover the bowl with a clean towel and let it rest for 20–30 minutes.
Step 2 – Knead the Dough
After the rest, knead the dough by hand for 6–8 minutes or use a stand mixer with a dough hook for about 5 minutes on low speed.
The dough should become smooth, soft, and slightly tacky. If it sticks heavily to your hands, dust with only a small amount of flour. Avoid adding too much because it can make the muffins dense.
Step 3 – Bulk Fermentation
Place the dough back into the bowl and cover.
Leave it at room temperature for 5–6 hours, or until it becomes noticeably puffy and has increased in size by about 60–70%.
The exact time depends on how warm your kitchen is. A warmer kitchen speeds up fermentation, while a cooler room may require another hour or two.
Step 4 – Divide the Dough
Lightly flour your countertop.
Turn the dough out gently without pressing out all the air.
Divide it into 18 equal pieces, about 80g each.
Using a kitchen scale helps every muffin cook evenly.
Step 5 – Shape the Muffins
Shape each piece into a smooth ball by folding the edges underneath.
Flatten each ball gently until it is about 1 inch (2.5 cm) thick.
Don’t press too hard—you want to keep as much air inside the dough as possible.
Step 6 – Coat with Cornmeal
Sprinkle cornmeal generously over a parchment-lined tray.
Place the shaped muffins on top and dust the tops lightly with more cornmeal.
Cover loosely with a kitchen towel and let them rest for 30–45 minutes until slightly puffy.
Step 7 – Cook the Muffins
Heat a cast-iron skillet, heavy frying pan, or non-stick skillet over medium-low heat.
Do not grease the pan.
Cook 3–4 muffins at a time, leaving space between them.
Cook for 6–8 minutes on the first side.
Flip carefully and cook another 6–8 minutes.
The muffins should be evenly golden brown and feel firm around the edges.
If they brown too quickly before the center cooks, reduce the heat immediately.
For perfectly cooked centers, the internal temperature should reach 200°F (93°C).
If necessary, transfer the muffins to a 350°F (175°C) oven for 5 minutes to finish cooking.
Step 8 – Cool and Split
Transfer the muffins to a cooling rack.
Allow them to cool for at least 20 minutes.
Instead of using a knife, split each muffin with a fork by poking around the edges before pulling it apart.
This creates the classic nooks and crannies that hold melted butter, jam, honey, or peanut butter beautifully.
Expert Tips for Perfect Sourdough English Muffins
Making sourdough English muffins is fairly simple, but a few small details can make a noticeable difference in the final result.
- Use an active starter: Feed your sourdough starter a few hours before mixing the dough. A bubbly, active starter produces lighter and fluffier muffins.
- Don’t over-flour the dough: The dough should feel soft and slightly tacky. Adding too much flour can make the muffins dry and dense.
- Cook over medium-low heat: Slow cooking allows the inside to bake through while creating an evenly golden crust. If the skillet is too hot, the outside may brown before the center is fully cooked.
- Use a kitchen scale: Weighing your ingredients gives much more consistent results than measuring by volume alone.
- Split with a fork: Instead of slicing with a knife, use a fork to separate the muffins. This creates the classic nooks and crannies that hold melted butter and jam beautifully.
- Let them cool first: Resist the temptation to open them immediately. Cooling for at least 20 minutes helps the crumb finish setting and improves the texture.
Frequently Asked Questions
Can I use all-purpose flour instead of bread flour?
Yes. Bread flour creates a chewier texture, but all-purpose flour works well if that’s what you have. The muffins will simply be a little softer.
Can I prepare the dough the night before?
Absolutely. After mixing the dough, let it begin fermenting for about an hour at room temperature, then refrigerate it overnight. The next day, allow it to warm slightly before shaping and cooking.
Why are my English muffins dense?
Dense muffins are usually caused by an inactive starter, under-fermented dough, or adding too much extra flour during kneading and shaping.
Why did my muffins burn on the outside?
The skillet was likely too hot. English muffins need gentle, medium-low heat so the centers cook completely before the crust becomes too dark.
Do I need English muffin rings?
No. This recipe is designed to be shaped by hand, giving the muffins a rustic homemade appearance while still keeping their classic shape.
How do I know when they’re fully cooked?
The muffins should be evenly golden on both sides and feel firm when gently pressed. For the most accurate result, the center should reach 200°F (93°C) using an instant-read thermometer.
Can I freeze homemade sourdough English muffins?
Yes. Once completely cool, store them in a freezer-safe bag for up to three months. Toast directly from frozen for the best texture.
Final Thoughts
Homemade sourdough English muffins are one of those recipes that quietly become part of your regular baking routine. They require a little patience, but the reward is a batch of soft, chewy muffins with crisp golden edges and plenty of buttery nooks and crannies. Whether you enjoy them fresh from the skillet, toasted with your favorite jam, or stacked into a hearty breakfast sandwich, they’re a simple reminder that homemade food often tastes better than anything you’ll find at the grocery store.