One dough, six mini loaves, and a much easier way to discover your next favorite sourdough flavor.
The idea for this recipe came after one too many disappointing full-size experiments. I had spent an entire day making a large flavored sourdough loaf only to realize that the combination wasn’t something we wanted to eat for the next several days.
So we started doing something different.
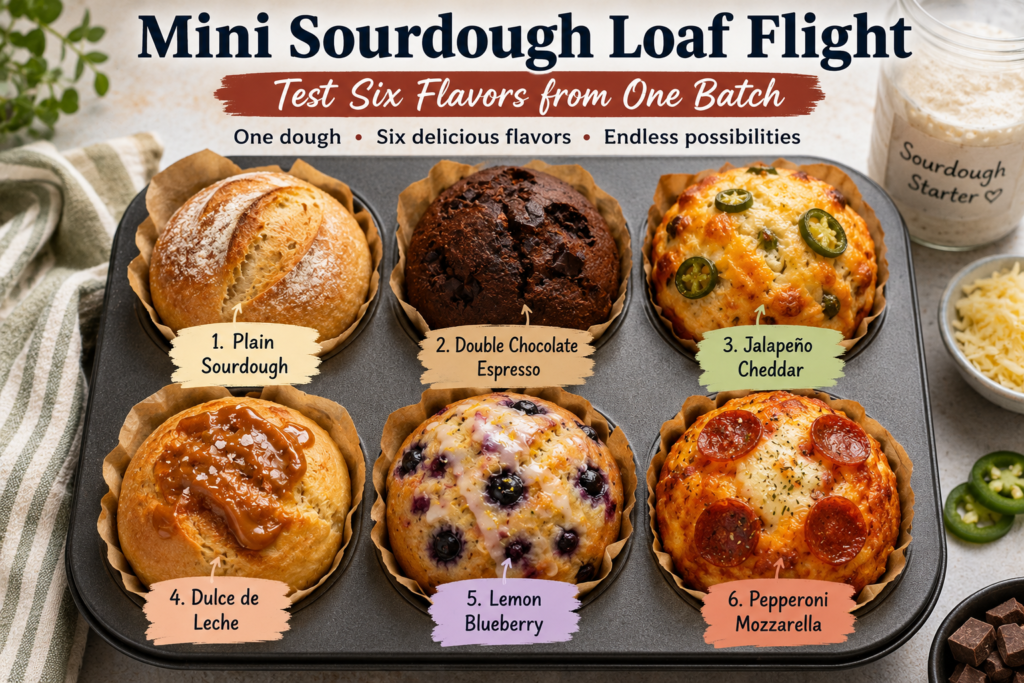
Instead of committing to one flavor, we divided a single batch of sourdough dough into six small portions and turned baking day into a tasting flight. One loaf stayed plain as a control, while the others became double chocolate espresso, jalapeño cheddar, dulce de leche, lemon blueberry, and pepperoni mozzarella.
A few combinations needed minor tweaks, but several were instant winners. Best of all, we learned more from one baking session than we usually would from six separate loaves.
Why Mini Sourdough Loaves Work So Well
- You can test multiple flavors from one batch of dough.
- Less flour and fewer ingredients are wasted.
- Mini loaves bake faster than a full-size boule.
- Everyone can choose a different flavor.
- It’s easier to compare texture, rise, and flavor side by side.
The plain loaf is especially helpful because it shows whether any problem came from the base dough or from a specific addition.
Equipment
- Digital kitchen scale
- Large mixing bowl
- Dough scraper or sturdy spatula
- Six small bowls for the flavor ingredients
- Standard or jumbo muffin pan
- Parchment paper
- Sharp knife, razor, or bread lame
- Metal baking pan for steam
- Wire cooling rack
A quick sketch showing where each flavor sits in the pan will save a lot of guessing later.
Base Sourdough Dough
Ingredients
- 80 g active sourdough starter (about ⅓ cup)
- 275 g lukewarm water (about 1 cup + 2 tbsp)
- 400 g bread flour (about 3⅓ cups, lightly spooned)
- 8 g fine sea salt (about 1⅓ tsp)
Mix the Dough
- Stir the starter into the water until mostly dissolved.
- Add the flour and salt.
- Mix until no dry flour remains. The dough will be rough and slightly sticky.
- Cover and rest for 30 minutes.
Build Strength
Perform 3 sets of stretch-and-folds at 30-minute intervals. If the dough still feels loose, do a fourth set.
Bulk Fermentation
Let the dough ferment until it has increased by about 50–75% in volume and looks airy with visible bubbles. In a 74–76°F (23–24°C) kitchen, this usually takes 4–6 hours from the initial mix.
Divide the Dough
Turn the dough onto a lightly dampened surface and divide it into 6 equal pieces, about 125–130 g each. Cover the pieces while preparing the flavor additions.
The Six Flavors
1. Plain Sourdough
No additional ingredients.
2. Double Chocolate Espresso
- 1 tsp unsweetened cocoa powder
- ¼ tsp instant espresso powder
- 1 tsp water
- 12–15 g chopped dark or semisweet chocolate
Mix the cocoa, espresso, and water into a paste before folding it into the dough.
3. Jalapeño Cheddar
- 12–15 g shredded sharp cheddar
- 1 tsp finely chopped jalapeño
- Pinch of garlic powder (optional)
Drain pickled jalapeños well before using.
4. Dulce de Leche
- 2 tsp chilled, thick dulce de leche
- Pinch of flaky salt (optional)
Place the filling in the center and fold the dough around it instead of kneading it through the dough.
5. Lemon Blueberry
- ½ tsp finely grated lemon zest
- 10–12 g blueberries (dried, fresh, or frozen)
- 1 tsp sugar (optional)
Dried blueberries are the easiest option because they add less moisture.
6. Pepperoni Mozzarella
- 10 g finely chopped pepperoni
- 12–15 g shredded low-moisture mozzarella
- Pinch of Italian seasoning (optional)
Use low-moisture mozzarella, not fresh mozzarella.
Shape the Mini Loaves
- Gently stretch one dough piece into a small rectangle.
- Add the flavor ingredients, keeping them away from the edges.
- Fold the dough over the fillings and shape it into a loose round.
- Rest for 15 minutes.
- Line six muffin-pan wells with parchment squares.
- Shape each portion into a compact round with gentle surface tension.
- Place seam-side down in the prepared cups.
Final Proof
Cover loosely.
- Same-day bake: 45–90 minutes at room temperature.
- Overnight option: Refrigerate 8–12 hours and bake directly from the fridge.
The dough should look slightly puffy, and a gentle fingertip indentation should return slowly.
8. Preheat the Oven
- Place an empty metal baking pan on the lower oven rack.
- Preheat the oven to 450°F (232°C) for at least 30 minutes.
- Bring about 1 cup of water to a boil shortly before baking.
9. Score the Loaves
- Dust the tops lightly with flour if desired.
- Use a sharp knife, razor, or bread lame to make a shallow cut about ¼ inch (6 mm) deep across each loaf.
- Use a different scoring pattern for each flavor so they remain easy to identify after baking.
10. Bake
- Place the muffin pan on the center oven rack.
- Carefully pour 1 cup of boiling water into the hot metal pan on the lower rack and close the oven door immediately.
- Bake at 450°F for 10 minutes.
- Remove the steam pan carefully, reduce the oven temperature to 425°F (218°C), and bake for another 10–15 minutes.
The loaves are done when they are well risen, golden, firm, and register 200–210°F (93–99°C) internally.
Tip: Cheese-topped loaves may brown faster than the others. Loosely cover them with a small piece of foil during the final few minutes if needed.
11. Cool
- Let the loaves rest in the muffin pan for 5 minutes.
- Lift them out using the parchment and transfer them to a wire rack.
- Cool for at least 45 minutes before slicing.
This is especially important for loaves containing chocolate, fruit, cheese, or dulce de leche, since the crumb continues to set as it cools.
Create Your Sourdough Tasting Flight
Slice each loaf into thin wedges and arrange them from mildest to strongest:
- Plain Sourdough
- Lemon Blueberry
- Dulce de Leche
- Double Chocolate Espresso
- Jalapeño Cheddar
- Pepperoni Mozzarella
Taste a small piece of plain bread or sip water between flavors.
For each loaf, rate:
- Overall flavor
- Crumb texture
- Strength of the inclusion
- Whether it deserves a full-size bake
Those notes become incredibly useful the next time inspiration strikes.
Frequently Asked Questions
Can I use sourdough discard instead of active starter?
No. This recipe relies on an active, recently fed sourdough starter for proper rise. Sourdough discard alone won’t provide enough natural leavening unless commercial yeast is added.
Can I bake these in mini loaf pans?
Yes. Mini loaf pans work perfectly for this recipe. Since pan sizes vary, begin checking the loaves for doneness after 18–20 minutes and continue baking until they are golden brown and the internal temperature reaches 200–210°F (93–99°C).
Can I freeze the mini loaves?
Absolutely. Allow the loaves to cool completely, then wrap each one tightly in plastic wrap or foil and place them in a freezer-safe bag. They can be frozen for up to 2 months. Thaw at room temperature and warm in a 325°F (163°C) oven for the best texture.
Which flavor is best for beginners?
Plain sourdough and jalapeño cheddar are excellent choices for beginners. Both are easy to prepare, forgiving during baking, and don’t introduce as much extra moisture as fruit or sweet fillings.
You May Also Like
If you enjoyed this recipe, you may also like these homemade sourdough favorites:
- Easy Sourdough Discard Skillet Pizza
- Sourdough Cinnamon Rolls
- Sourdough Sandwich Bread
- Chocolate Chip Sourdough Cookies
Nutrition Disclaimer
Nutrition information is provided as an estimate only and may vary depending on the exact ingredients, brands, and flavor combinations used.
Recipe Summary
Prep Time: 45 minutes
Bulk Fermentation: 5–8 hours
Final Proof: 45–90 minutes (or 8–12 hours for an overnight cold proof)
Bake Time: 20–25 minutes
Total Time: Approximately 7–10 hours
Yield: 6 mini loaves
Category: Bread, Sourdough Recipes
Method: Naturally Leavened, Fermented, Oven-Baked
Cuisine: American
Approximate Nutrition (per mini loaf):
Calories: 310 • Carbohydrates: 59g • Protein: 11g • Fat: 4g • Fiber: 2g • Sodium: 585mg