
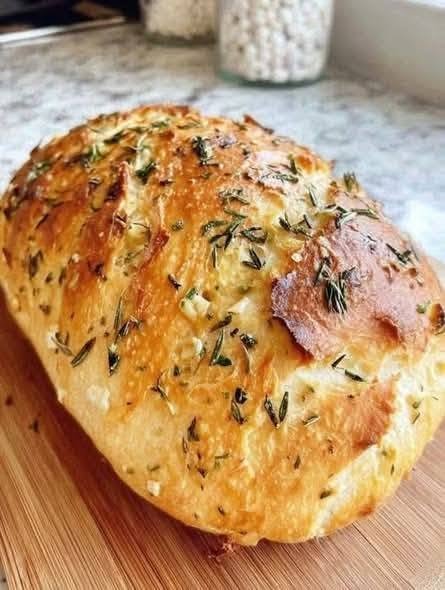
There are some baking days when I want homemade bread but definitely do not want to spend 15 or 20 minutes standing over a bowl, kneading sticky dough. That is exactly why this no-knead rosemary garlic bread has become one of my favorite loaves to make.
The first time I made a loaf like this, I was honestly surprised by how rough the dough looked after mixing. It was sticky, uneven, and definitely did not look like the smooth dough I was used to seeing in bread recipes. My first instinct was to add more flour.
That turned out to be a mistake.
The dough was supposed to be sticky. After a long overnight rise and a hot Dutch oven, it transformed into a crusty, golden loaf with a soft, chewy center.
The combination of roasted garlic and fresh rosemary makes the kitchen smell incredible while it bakes. You get a crisp crust on the outside, plenty of flavor inside, and the whole process requires very little hands-on work.
If you have never made homemade bread before, this is one of those recipes that looks much harder than it actually is.
Why I Like This No-Knead Bread
The biggest advantage is obvious: there is no kneading.
You mix the ingredients, cover the bowl, and leave the dough alone for several hours. The long resting period gives the flour time to absorb the water and allows the yeast to develop flavor and structure.
The Dutch oven does the rest.
Keeping the dough covered during the first part of baking traps steam around the loaf. That helps the bread rise and creates a beautiful crust. Removing the lid toward the end lets the outside turn deep golden brown and crisp.
I also prefer roasted garlic over raw garlic here. Raw garlic can have a strong, sharp flavor, while roasted garlic becomes softer, sweeter, and much more mellow.
Ingredients
For one rustic loaf, you will need:
- 3 cups all-purpose flour or bread flour
- 2 teaspoons salt
- ½ teaspoon instant yeast
- 1½ cups warm water
- 2 tablespoons fresh rosemary, finely chopped
- 4 cloves roasted garlic, mashed
- 1 tablespoon olive oil, optional
- A little extra flour for shaping
- Parchment paper for transferring the dough
You do not need any special mixer for this recipe. A large bowl, wooden spoon or spatula, parchment paper, and Dutch oven are enough.
All-Purpose Flour or Bread Flour?
Both work.
Bread flour can give the loaf a slightly chewier texture, while all-purpose flour works perfectly well and is often what I use because it is already in my pantry.
If you are new to bread baking, I would not worry too much about this choice. The technique is more important than chasing a particular type of flour.
Step 1: Mix the Dough
Start with a large mixing bowl. Add the flour, salt, and instant yeast.
Give everything a quick whisk or stir so the yeast and salt are distributed throughout the flour.
Pour in the warm water and add the chopped rosemary, mashed roasted garlic, and olive oil if you are using it.
Now stir everything together with a wooden spoon or sturdy spatula.
At first, the dough may look dry in a few places. Keep stirring until there are no obvious pockets of dry flour.
The finished dough should look rough and sticky.
And this is where it is important to resist the temptation to add lots of extra flour.
I have made the mistake of doing that with no-knead dough. It makes the dough easier to handle, but the finished bread can become noticeably heavier.
For this recipe, sticky is good.
Step 2: Cover and Let It Rise Overnight
Cover the bowl tightly with plastic wrap or use a clean kitchen towel.
Leave it at room temperature for approximately 12 to 18 hours.
I usually think of this as an overnight bread because it makes the timing so convenient. Mix the dough in the evening, leave it overnight, and continue the recipe the next morning.
The dough will slowly change while you are not doing anything.
When you check it again, it should look puffy and bubbly. Depending on the temperature in your kitchen, it may also be close to double its original size.
Your Kitchen Temperature Matters
This is one detail that can make the recipe behave differently from one kitchen to another.
A warm kitchen can make the dough rise faster. A cooler room may slow it down.
So don’t judge the dough only by the clock.
If your kitchen is particularly warm, start checking the dough earlier. If your kitchen is cool, it may need more time.
The goal is a dough that looks alive, bubbly, and well-risen.
Step 3: Shape the Dough
When the dough has finished its long rise, lightly flour your work surface.
Carefully scrape the dough out of the bowl.
It will probably feel soft and sticky. That is normal.
Dust your hands with a small amount of flour if necessary, then gently fold the outer edges of the dough toward the center.
Turn it into a rough round loaf.
There is no need to knead it at this stage.
In fact, try not to handle it more than necessary. The dough has spent hours developing air bubbles, and aggressive handling can knock much of that air out.
Place a piece of parchment paper on your work surface and put the shaped dough on top.
Cover it loosely and let it rest for another 30 to 40 minutes.
This short second rest gives the dough a chance to relax before baking.
Step 4: Preheat the Dutch Oven
This step makes a big difference.
Place your Dutch oven, including the lid, inside the oven.
Set the temperature to:
450°F (230°C)
Let the Dutch oven heat for at least 30 minutes.
Do not rush this part.
A properly heated Dutch oven gives the dough an immediate burst of heat when it goes inside. The covered environment also traps steam, which helps produce that characteristic crusty exterior.
Be Careful With the Hot Dutch Oven
A Dutch oven at 450°F is extremely hot.
Use proper oven mitts and be careful when handling the lid and pot. Also remember that the handles remain hot for quite a while after the pot comes out of the oven.
Keep the parchment paper ready so you can transfer the dough quickly.
Step 5: Bake the Bread
Once the Dutch oven is fully heated, carefully remove it from the oven.
Using the parchment paper as a sling, lower the dough into the hot pot.
Put the lid on immediately.
Return the Dutch oven to the oven and bake for:
30 minutes covered
After 30 minutes, carefully remove the lid.
You should already see the loaf starting to develop color.
Continue baking for another 10 to 15 minutes, uncovered.
The crust should become deep golden brown and feel firm when tapped.
If you like a darker, more rustic crust, you can add a few extra minutes. Just keep an eye on it because the rosemary and garlic can darken if the loaf is left too long.
Step 6: Don’t Slice It Immediately
This is probably the hardest part of the whole recipe.
The bread smells amazing when it comes out of the oven, and it is very tempting to cut a slice immediately.
Try to wait.
Transfer the loaf to a wire rack and let it cool for at least 30 to 60 minutes.
The inside continues to set as it cools. If you slice it too early, the crumb can seem gummy or overly moist even though the bread has been baked properly.
I know waiting is difficult, especially when you can smell roasted garlic and rosemary throughout the kitchen, but the finished texture is worth it.
How to Roast Garlic for the Bread
Roasted garlic is one of the details that makes this loaf special.
You can roast the garlic while preparing another meal, then save the roasted cloves for the bread.
Place whole garlic cloves or a small garlic bulb on foil. Drizzle with a little olive oil and wrap loosely.
Bake at:
375°F (190°C) for about 30 to 40 minutes
The garlic should become very soft and lightly golden.
Let it cool enough to handle, then squeeze or scoop the softened garlic out and mash it with a fork.
For this bread, you need about 4 roasted garlic cloves.
Why Roast Instead of Using Raw Garlic?
Raw garlic has a much stronger and sharper flavor.
Roasting changes its character completely. The cloves become soft and mellow with a slightly sweet, rich flavor.
That works especially well with rosemary because neither flavor completely overwhelms the bread.
Practical Tips That Make a Difference
1. Keep the Dough Sticky
Don’t keep adding flour just because the dough feels difficult to handle.
No-knead dough is supposed to be wetter and stickier than traditional kneaded bread dough.
Use a little flour on your hands and work surface rather than adding large amounts directly into the dough.
2. Use Fresh Rosemary
Fresh rosemary gives the loaf a brighter aroma and flavor.
Finely chop it before adding it to the dough so you don’t end up with large woody pieces in individual slices.
If you have a rosemary plant growing at home, this is a great recipe for using a small handful.
3. Don’t Overdo the Garlic
Four roasted cloves provide a noticeable garlic flavor without making every bite taste overwhelmingly garlicky.
If you love garlic, you may be tempted to add much more. Remember that roasted garlic has a concentrated flavor, so a little can go a long way.
4. Give the Dough Enough Time
The overnight rise is not just about convenience.
The long fermentation gives the dough time to develop flavor and texture.
If you shorten the rising time significantly, the bread may not have the same airy texture or developed flavor.
5. Preheat the Pot Properly
A cold Dutch oven can still bake bread, but it will not give you the same immediate heat that a thoroughly preheated pot provides.
Give it the full 30 minutes of preheating.
6. Use Parchment as a Sling
Trying to pick up soft, sticky dough and drop it directly into a screaming-hot Dutch oven is unnecessarily difficult.
Parchment makes the process much easier.
Place the dough on parchment before the final rest, then lift the paper from both sides and lower the whole thing into the pot.
Common Mistakes to Avoid
Adding Too Much Flour
This is probably the easiest mistake to make.
Sticky dough can look wrong, especially if you are used to traditional bread recipes.
But adding too much flour can produce a dense loaf.
Using Water That Is Too Hot
Warm water is fine. Very hot water is not.
Extremely hot water can negatively affect the yeast.
The water should feel comfortably warm rather than hot.
Skipping the Dutch Oven Preheat
The hot pot is an important part of the baking process.
Give it enough time to heat properly before adding the dough.
Cutting the Bread While It Is Piping Hot
A fresh loaf smells irresistible, but slicing immediately can interfere with the final crumb texture.
Give it at least 30 minutes, preferably closer to an hour if you can wait.
Handling the Dough Too Aggressively
After an overnight rise, the dough contains plenty of air.
You don’t need to punch it down repeatedly or knead it again.
Gentle folding and shaping are enough.
What If the Dough Doesn’t Rise Much?
Don’t automatically throw it away.
First consider the temperature of your kitchen.
If the room is cool, the dough may simply need more time.
Also check whether your instant yeast is still fresh. Yeast that has been sitting in an opened packet or container for a long time may not perform as expected.
Give the dough more time in a reasonably warm area and look for visible bubbling and expansion rather than relying only on the clock.
What If the Bread Is Too Dense?
There are several possible reasons.
The dough may not have risen enough, or too much flour may have been added during mixing or shaping.
Another possibility is that the dough was handled too aggressively after the overnight rise.
Next time, keep the dough slightly sticky, give it enough time to ferment, and shape it gently.
What to Serve With Rosemary Garlic Bread
This bread is flexible enough to fit into almost any meal.
With Soup
A warm bowl of tomato soup, vegetable soup, lentil soup, or creamy soup becomes much more satisfying with a thick slice of crusty bread on the side.
With Pasta
Use the bread for soaking up leftover sauce from the plate.
It works particularly well with creamy pasta, tomato sauces, and baked pasta dishes.
With Roasted Meat
The rosemary and garlic flavors naturally complement roasted chicken, beef, or other savory dishes.
With Olive Oil
For something simple, slice the bread and serve it with extra virgin olive oil for dipping.
A little salt and freshly ground black pepper can make this surprisingly satisfying.
Toasted
Older slices don’t have to go to waste.
Toast them in a toaster or oven and serve with butter, olive oil, eggs, soup, or even avocado.
How to Store the Bread
Let the loaf cool completely before storing it.
For short-term storage, keep it in a bread box, paper bag, or clean kitchen towel.
I prefer not to put crusty homemade bread into a tightly sealed plastic bag at room temperature because the trapped moisture can soften the crust.
For longer storage, freezing works much better.
Slice the bread first, then place the slices in an airtight freezer bag.
That way, you can take out only what you need instead of defrosting the entire loaf.
Warm individual slices in a toaster or oven until they are hot and crisp again.
My Favorite Way to Eat It
My favorite time to eat this bread is when it is still slightly warm, with a little butter melting into the crust.
But it is also excellent alongside dinner.
The crust gives you that satisfying crunch, while the inside stays soft enough to soak up soup or pasta sauce.
And because the rosemary and roasted garlic are already baked into the loaf, you don’t need much else to make it flavorful.
A Simple Overnight Baking Schedule
If you want an easy routine, try this:
8:00 PM: Mix the dough.
8:10 PM: Cover the bowl and leave it at room temperature.
8:00 AM: Check the dough and shape the loaf.
8:00–8:40 AM: Let the shaped dough rest.
8:10 AM: Start preheating the Dutch oven if you want it ready as the final rest finishes.
8:40 AM: Transfer the dough to the hot Dutch oven.
8:40–9:10 AM: Bake covered.
9:10–9:25 AM: Bake uncovered.
9:25–10:00 AM: Let the bread cool before slicing.
The exact timing will depend on your kitchen temperature and how quickly your oven heats, but this gives you a useful starting point.
Final Thoughts
What I like most about this rustic rosemary garlic bread is that it doesn’t require complicated bread-making skills.
There is no stand mixer, no long kneading session, and no need to spend the evening worrying about whether the dough looks perfect.
The dough is supposed to look a little rough.
Give it time, keep the handling gentle, and let the Dutch oven do the heavy lifting.
The combination of a crisp golden crust, soft chewy center, roasted garlic, and fresh rosemary makes this loaf feel much more special than the amount of work involved.
Once you get comfortable with the basic method, you can also start making small changes—such as adding different herbs, using the bread for sandwiches, or turning leftover slices into toast.
For a weekend dinner or a simple overnight baking project, this is the kind of homemade bread recipe that is easy to come back to.
