Author: Blog

  • Homemade Pop-Tarts: Buttery, Flaky Pastries With Your Favorite Filling

    Homemade Pop-Tarts: Buttery, Flaky Pastries With Your Favorite Filling

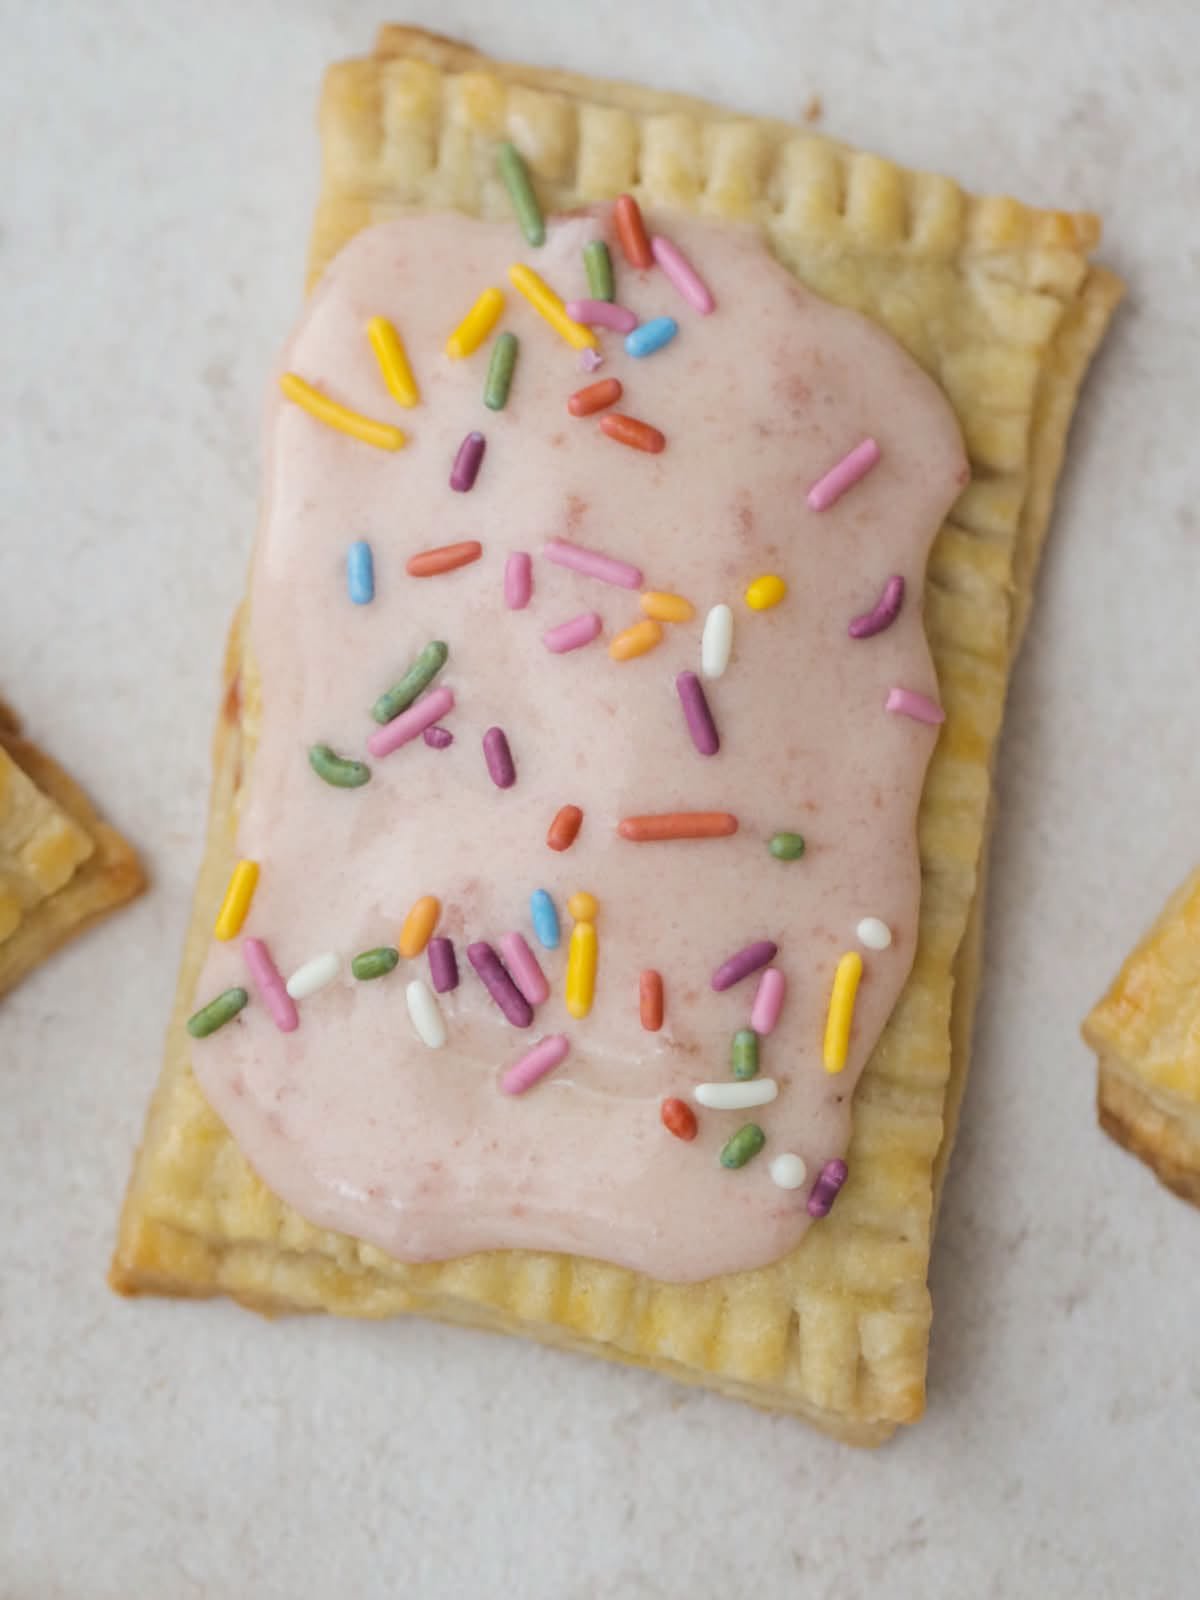
    There are mornings when a bowl of cereal or a piece of toast is all you have time for. But when you have a few extra minutes, homemade Pop-Tarts are a completely different experience.

    The first thing you notice is the pastry itself. Instead of a dry, packaged crust, you get a buttery shell that is crisp around the edges and tender in the middle. Then there is the filling. You can keep it simple with cinnamon sugar, or switch things up with Nutella, pumpkin butter, peanut butter and jelly, or homemade fruit preserves.

    I particularly like this recipe because you don’t need fancy pastry equipment. A mixing bowl, pastry blender or two knives, a rolling pin, a knife, parchment paper, and a baking sheet are enough.

    And once you get comfortable with the basic dough, you can make different fillings depending on what you already have in the kitchen.

    Why Make Pop-Tarts at Home?

    The biggest advantage is control.

    When you make them yourself, you decide what goes between the pastry layers. You can make them lightly sweet or more indulgent, and you can experiment with fillings that aren’t available in a regular box of Pop-Tarts.

    Another advantage is that the pastries freeze well. That makes them useful for busy mornings when you don’t have time to prepare something from scratch.

    You can make a batch on the weekend, cool them completely, and store them for later.

    The dough itself is also surprisingly simple. It is essentially a buttery pastry made with flour, sugar, salt, chilled butter, vanilla, and cold water.

    The important word here is chilled.

    Keeping the butter cold is one of the easiest ways to improve the texture of the finished pastry.

    Ingredients You’ll Need

    For about 10 homemade pastries, you’ll need:

    For the Pastry

    • 2 cups all-purpose flour
    • 1 tablespoon white sugar
    • 1 teaspoon salt
    • 1 cup chilled unsalted butter, cut into cubes
    • ½ teaspoon vanilla extract
    • ¼ cup cold water

    For the Cinnamon Filling

    • ¼ cup unsalted butter, softened
    • ¼ cup white sugar
    • 2 tablespoons ground cinnamon

    This cinnamon filling is only one option. Once you’ve made the basic pastry, you can experiment with other fillings.

    A Quick Note About the Butter

    This is probably the ingredient I would pay the most attention to.

    The butter needs to be chilled when you cut it into the flour. If the butter becomes warm and greasy while you’re working, the pastry can become difficult to handle and may lose some of its flaky texture.

    I like cutting the butter into small cubes before starting. It makes it easier to distribute through the flour without having to work the dough excessively.

    If your kitchen is warm, don’t be afraid to put the dough back in the refrigerator for a few minutes.

    That’s much better than trying to fight with soft pastry dough.

    How to Make Homemade Pop-Tarts

    Step 1: Prepare the Oven

    Start by preheating your oven to 375°F (190°C).

    Line two baking sheets with parchment paper.

    The parchment isn’t absolutely complicated equipment—it simply makes cleanup easier and helps prevent the pastries from sticking to the baking sheets.

    If you have reusable silicone baking mats, those can also work.

    Step 2: Mix the Dry Ingredients

    Sift the flour, sugar, and salt into a large mixing bowl.

    This distributes the ingredients evenly and helps break up any lumps in the flour.

    You don’t need an electric mixer for this recipe.

    In fact, I prefer doing this part by hand because it gives you more control over the pastry.

    Step 3: Cut in the Cold Butter

    Add the cubed chilled butter to the flour mixture.

    Use a pastry blender or two knives to cut the butter into the flour.

    You’re looking for pieces of butter roughly resembling small peas.

    Don’t keep mixing until the mixture becomes completely smooth.

    Those little pieces of butter are useful. As the pastry bakes, the butter helps create a tender, flaky texture.

    One common mistake is trying to make the mixture look like a smooth dough too early. Resist that temptation.

    Step 4: Add Vanilla and Cold Water

    Add the vanilla extract.

    Then begin adding the cold water gradually, about one tablespoon at a time.

    Mix gently after each addition.

    You may not need exactly the same amount of water every time. The goal is simply to bring the dough together into a ball.

    If the dough is still crumbly, add a little more cold water.

    Don’t pour in a large amount at once.

    It is much easier to add another spoonful than to fix dough that has become too wet.

    Step 5: Chill the Dough

    Divide the dough into two pieces.

    Wrap each piece and place them in the refrigerator.

    Let the dough chill for at least 1 hour, or until it feels firm.

    This waiting period can feel annoying when you’re ready to bake, but it serves an important purpose.

    The chilled dough is easier to roll and shape, and keeping the butter cold helps the pastry behave better during baking.

    If the dough starts feeling soft or sticky later, simply chill it again.

    Step 6: Make the Cinnamon Filling

    While the dough chills, prepare the filling.

    Add softened butter, sugar, and cinnamon to a small bowl.

    Mix until everything is evenly combined.

    The filling should be spreadable but not runny.

    If your butter is extremely soft or melted, place the mixture in the refrigerator for a short time.

    A firmer filling is easier to portion onto the pastry.

    Step 7: Roll Out the Dough

    Lightly flour your work surface.

    Take one portion of chilled dough and roll it out until it is approximately ½ inch thick.

    Try to maintain an even thickness.

    If one section is much thinner than another, that area can brown faster during baking.

    You don’t need perfect rectangles at this point. You’ll be trimming or cutting the dough into pastry shapes anyway.

    Step 8: Cut the Pastry Rectangles

    Use a knife to cut the rolled dough into rectangles.

    Try to make the rectangles reasonably similar in size.

    This makes assembling the pastries easier because you’ll be matching one piece with another.

    Don’t throw away the scraps.

    You can gently reroll them and make additional pastry pieces.

    However, avoid rerolling the dough over and over. Excessive handling can make the pastry less tender.

    Step 9: Add the Filling

    Place about 1 tablespoon of cinnamon filling onto half of the pastry rectangles.

    Leave a border around the edges.

    This is important.

    If the filling reaches the very edge, it can squeeze out when you seal the pastry.

    And once that sugary filling hits the baking sheet, it can become sticky and messy.

    Keep the filling in the center.

    Step 10: Add the Top Layer

    Place another rectangle of pastry over each filled piece.

    Gently press the edges together.

    Then use a fork to press around the entire border.

    This does two jobs: it seals the pastry and gives the edges that familiar homemade pastry appearance.

    Take your time here.

    A good seal is one of the easiest ways to prevent filling from escaping during baking.

    Step 11: Vent the Pastries

    Use a toothpick to make a few small holes in the top of each pastry.

    These little openings allow steam to escape while the pastries bake.

    Don’t make huge holes.

    A few small vents are enough.

    Skipping this step can sometimes cause the pastry to puff unevenly or put pressure on the seams.

    Step 12: Bake

    Arrange the assembled pastries on the parchment-lined baking sheets.

    Place the trays in the preheated oven.

    Bake for approximately 25 to 30 minutes, or until the pastries are golden brown.

    Keep an eye on them during the final few minutes.

    Every oven behaves a little differently, so the exact baking time can vary.

    If your oven tends to run hot, start checking earlier.

    Step 13: Cool Before Serving

    Remove the pastries from the oven and transfer them to a wire rack.

    Let them cool for around 15 minutes.

    This part is easy to underestimate.

    The filling can be extremely hot immediately after baking.

    Cooling also gives the pastry a chance to firm up.

    If you bite into one straight from the oven, you may find the filling much hotter than expected.

    My Favorite Filling Variations

    The cinnamon filling is a great starting point, but it isn’t the only option.

    Nutella

    A small amount of chocolate-hazelnut spread makes a rich filling.

    Don’t overfill the pastries. Nutella becomes soft when heated and can escape through weak seams.

    Pumpkin Butter

    Pumpkin butter is especially nice during fall.

    Its thick texture makes it easier to contain than a very thin fruit sauce.

    Peanut Butter and Jelly

    This combination is fun for kids and adults.

    Use a modest amount of peanut butter and jelly so the filling doesn’t push against the seams.

    Fruit Preserves

    Strawberry, raspberry, blueberry, and apricot preserves all work well.

    Thicker preserves are generally easier to use because they are less likely to leak.

    If your preserves are very loose, use less filling.

    Cinnamon Sugar

    If you want something extremely simple, skip the butter-based filling and use a cinnamon-sugar mixture.

    It’s a good option when you’re short on ingredients.

    Common Mistakes to Avoid

    1. Using Warm Butter

    Warm butter is one of the easiest ways to make pastry dough difficult.

    Keep the butter chilled when cutting it into the flour.

    2. Adding Too Much Water

    Start with a little water and add more only when necessary.

    Too much water can make the dough sticky and harder to work with.

    3. Overfilling the Pastries

    More filling doesn’t necessarily mean a better Pop-Tart.

    Too much filling can leak out during baking and prevent the edges from sealing properly.

    A tablespoon is a useful starting point.

    4. Skipping the Chill Time

    Don’t rush the refrigeration step.

    The dough needs time to firm up.

    If you try rolling very soft pastry, it can stick to your work surface and become frustrating to handle.

    5. Forgetting to Seal the Edges

    Simply placing one rectangle on top of another isn’t enough.

    Press the edges together firmly and finish with a fork.

    6. Not Venting the Tops

    Small holes give steam somewhere to escape.

    It only takes a few seconds, so it’s worth doing.

    How to Make the Process Easier

    If you’re making these with children, prepare the dough ahead of time.

    Once the pastry has been chilled, kids can help cut rectangles, add a small spoonful of filling, and press the edges with a fork.

    Just keep an eye on the filling quantity.

    Children tend to think that more chocolate or jam must automatically be better. Unfortunately, the pastry doesn’t always agree!

    A kitchen ruler can also be surprisingly useful if you want your rectangles to be similar in size.

    You don’t need to measure every piece perfectly, but keeping them roughly equal makes assembly much easier.

    Can Homemade Pop-Tarts Be Frozen?

    Yes, these pastries are convenient to freeze.

    Allow them to cool completely first.

    Then wrap them appropriately and place them in a freezer-safe container or bag.

    For best quality, protect them well from freezer air.

    When you want one, thaw it and warm it before serving.

    You can also toast a thawed pastry to bring back some of the crisp texture.

    Avoid storing warm pastries in a sealed container because trapped steam can make the pastry softer than you want.

    How to Store Leftovers

    If you plan to eat them within a short period, store completely cooled pastries in an airtight container.

    Keep them away from moisture.

    When serving leftovers, warming them slightly can improve the texture.

    A toaster oven is particularly handy because it can warm the pastry while keeping the outside relatively crisp.

    If you use a microwave, the pastry may become softer.

    Nutrition Information

    Based on the supplied recipe, one serving contains approximately:

    • 323 calories
    • 23g fat
    • 27g carbohydrates
    • 3g protein

    Actual nutrition can vary depending on the filling you use and how large each pastry is.

    Recipe at a Glance

    Prep Time: 20 minutes
    Cook Time: 25–30 minutes
    Additional Time: 1 hour 15 minutes
    Total Time: About 2 hours
    Yield: 10 pastries

    Pastry Ingredients

    • 2 cups all-purpose flour
    • 1 tablespoon white sugar
    • 1 teaspoon salt
    • 1 cup chilled unsalted butter, cubed
    • ½ teaspoon vanilla extract
    • ¼ cup cold water

    Cinnamon Filling

    • ¼ cup unsalted butter, softened
    • ¼ cup white sugar
    • 2 tablespoons ground cinnamon

    Basic Method

    1. Preheat the oven to 375°F (190°C).
    2. Line two baking sheets with parchment paper.
    3. Combine flour, sugar, and salt.
    4. Cut in chilled butter until small pieces remain.
    5. Add vanilla and enough cold water to bring the dough together.
    6. Divide and chill the dough for at least 1 hour.
    7. Mix the cinnamon filling.
    8. Roll the dough and cut it into rectangles.
    9. Place filling on half of the rectangles.
    10. Cover with the remaining dough pieces.
    11. Seal the edges with a fork.
    12. Poke small vents in the tops.
    13. Bake for 25–30 minutes until golden.
    14. Cool on a wire rack for about 15 minutes.

    Final Thoughts

    Homemade Pop-Tarts are one of those recipes that look more complicated than they actually are.

    The biggest lessons are simple: keep the butter cold, don’t add too much water, don’t overfill the pastry, and take the time to seal the edges properly.

    Once you get the basic technique down, the recipe becomes much more fun because you can change the filling depending on what you have at home.

    Cinnamon is an easy place to start, but fruit preserves, pumpkin butter, Nutella, and peanut butter with jelly can all turn the same pastry dough into something completely different.

    And if you’re making breakfast ahead of time, the freezer-friendly nature of these pastries makes them especially useful. A little preparation on one day can give you homemade pastries ready for several busy mornings.
  • Easy Homemade English Muffins: Soft, Chewy, and Better Than Store-Bought

    Easy Homemade English Muffins: Soft, Chewy, and Better Than Store-Bought

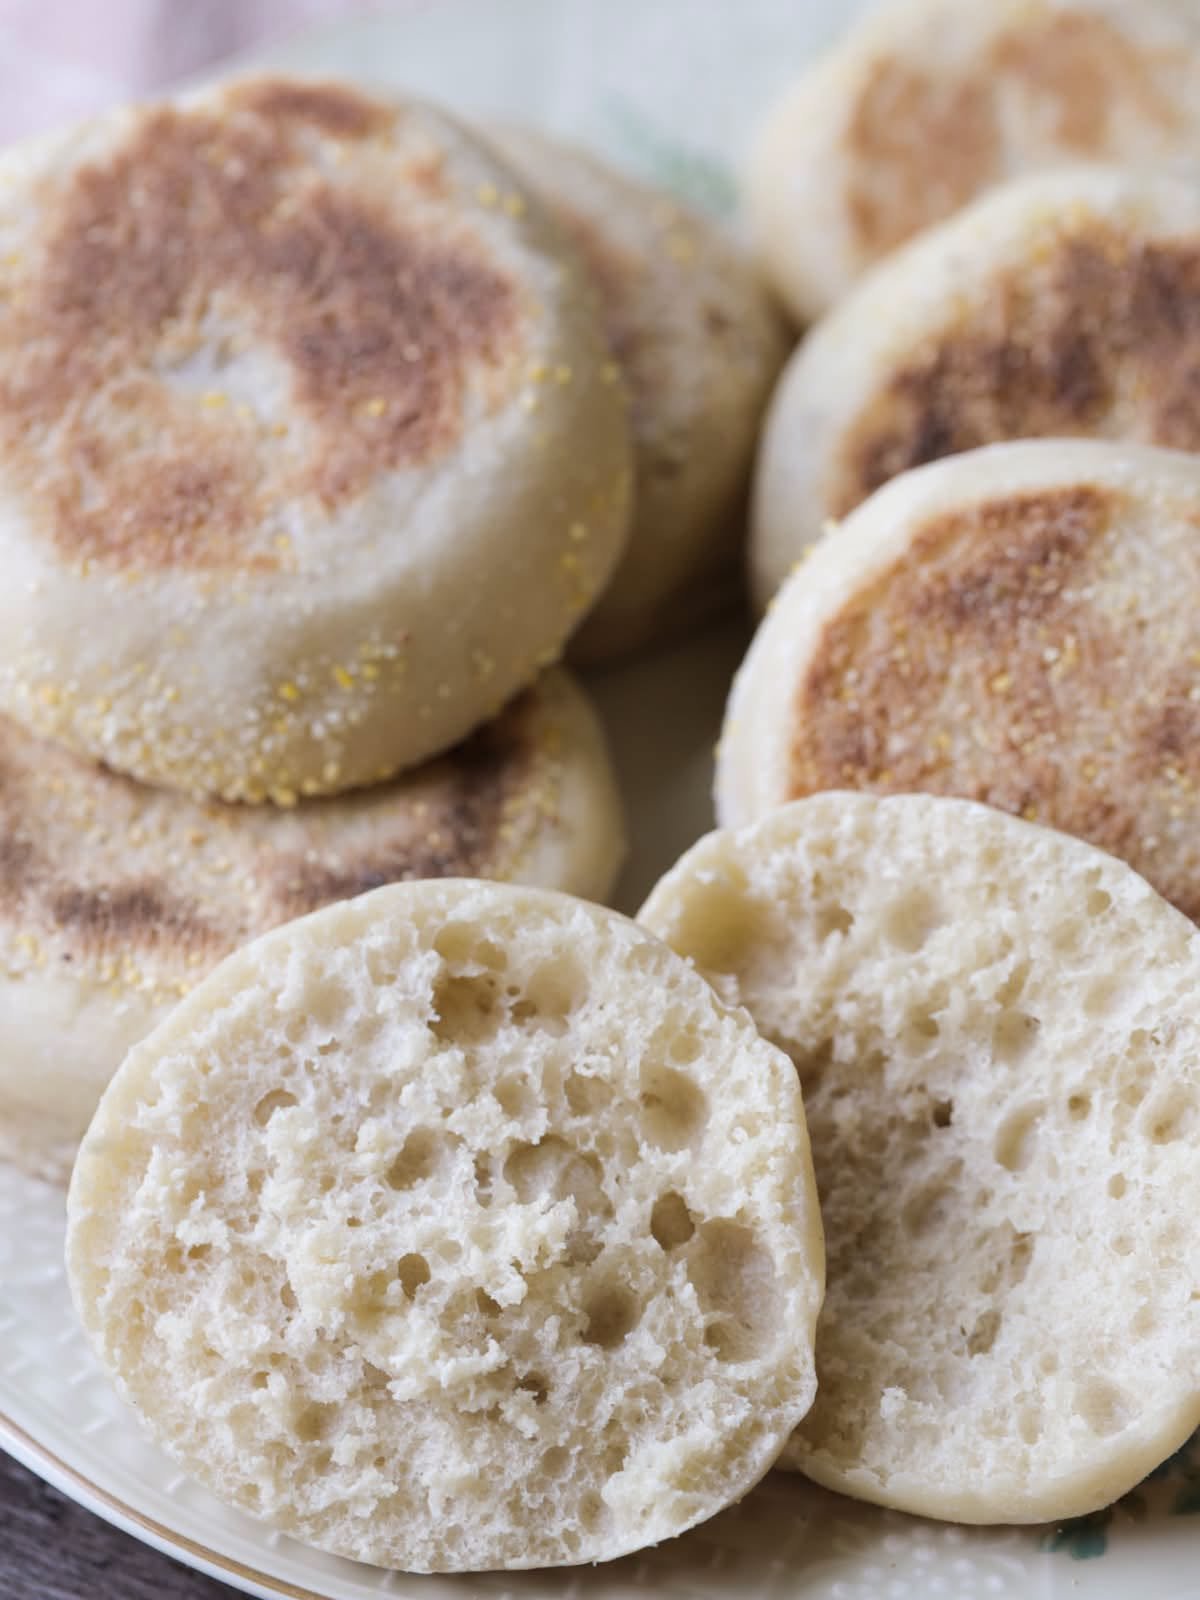
    There is something about homemade English muffins that makes a regular breakfast feel a little special. The first time you split one open and see those soft little air pockets inside, then toast it until the edges turn crisp, you quickly understand why people keep making this recipe for years.

    I especially like this recipe because it uses ingredients that are already common in most kitchens. There is no complicated equipment, no stand mixer required, and you don’t need a special English muffin pan. A basic griddle or heavy skillet works just fine.

    These muffins have a lightly crisp, golden outside while the inside stays soft and chewy. Toast one with butter, spread it with cream cheese and jam, or use it as the base for a breakfast sandwich.

    The recipe makes about 18 muffins, so it is also a great option when you want to prepare breakfast for several days.

    Why Homemade English Muffins Are Worth Making

    Store-bought English muffins are convenient, but homemade ones have a different texture. They are fresh, slightly chewy, and have a pleasant cornmeal-coated crust.

    Another thing I like about this recipe is that the muffins are cooked on a griddle rather than baked in an oven. That means you don’t have to heat the whole kitchen just to make breakfast.

    The biggest difference comes from cooking them slowly. If the heat is too high, the outside can become dark before the center has had enough time to cook. Medium heat is your friend here.

    Ingredients You’ll Need

    Here is what you need for approximately 18 homemade English muffins:

    • 1 cup milk
    • 2 tablespoons white sugar
    • 1 cup warm water
    • 1 packet active dry yeast (about 2 ¼ teaspoons)
    • 6 cups all-purpose flour
    • ¼ cup melted shortening
    • 1 teaspoon salt
    • ¼ cup cornmeal, plus extra for dusting

    A Note About the Flour

    Six cups of flour is the starting point, but don’t add everything blindly if your dough already feels right.

    Flour can behave differently depending on the brand, humidity, and how it is measured. The finished dough should be soft and workable rather than extremely stiff.

    If you add too much flour, the muffins can turn out heavy instead of light and chewy.

    How to Make English Muffins Step by Step

    1. Warm the Milk

    Pour the milk into a small saucepan and warm it until it begins to bubble around the edges.

    Remove it from the heat and stir in the sugar until dissolved.

    Let the milk cool until it is lukewarm.

    This cooling step is important. Very hot milk can interfere with the yeast later, so don’t rush this part.

    2. Activate the Yeast

    Pour the warm water into a small bowl and add the active dry yeast.

    Let it sit for about 10 minutes.

    The mixture should become creamy or slightly foamy. That’s a good indication that the yeast is active.

    If absolutely nothing happens after about 10 minutes, check the temperature of your water and the freshness of your yeast before continuing.

    Water that is too hot can damage the yeast, while water that is too cold may slow it down considerably.

    3. Start the Dough

    In a large mixing bowl, combine:

    • The lukewarm milk mixture
    • Activated yeast mixture
    • 3 cups of flour
    • Melted shortening

    Mix until the ingredients come together smoothly.

    Then add the salt and gradually work in the remaining flour.

    Knead until you have a soft dough.

    You don’t want a rock-hard dough here. It should feel soft and elastic and should be manageable with lightly floured hands.

    4. Let the Dough Rise

    Lightly grease a clean bowl and place the dough inside.

    Cover the bowl with a clean kitchen towel or plastic wrap and place it somewhere warm.

    Let it rise for about 1 hour, or until it has roughly doubled in size.

    The exact timing can vary. If your kitchen is cool, the dough may need longer. Don’t worry too much about the clock; look at the dough.

    A properly risen dough should look noticeably larger and feel airy.

    5. Roll Out the Dough

    Once the dough has doubled, gently punch it down to remove some of the excess air.

    Transfer it to a lightly floured surface.

    Roll the dough to approximately ½-inch thickness.

    Now cut out rounds using a biscuit cutter.

    If you don’t have one, a drinking glass can work surprisingly well. Just make sure the edge is clean and sharp enough to cut through the dough.

    Try to cut the rounds as close together as possible. This reduces the amount of dough that needs to be rerolled.

    6. Add the Cornmeal

    Sprinkle cornmeal over a sheet of waxed paper or another suitable surface.

    Place the dough rounds on top.

    Sprinkle a little more cornmeal over the tops.

    The cornmeal isn’t just for appearance. It gives the muffins that familiar slightly gritty exterior and helps prevent the dough from sticking.

    7. Give the Muffins a Second Rise

    Cover the dough rounds and let them rise for about 30 minutes.

    This short second rise makes a noticeable difference.

    Don’t skip it if you want softer, lighter muffins.

    They may not dramatically double in size during this stage, but they should look puffier.

    8. Heat the Griddle

    Lightly grease a griddle or heavy skillet and heat it over medium heat.

    This is one of the most important parts of the recipe.

    You don’t want a screaming-hot pan.

    English muffins are relatively thick compared with pancakes, so they need enough time for the center to cook before the exterior gets too dark.

    9. Cook the Muffins

    Carefully place the muffins on the heated griddle.

    Cook for approximately 10 minutes on the first side.

    Turn them over and cook for another 10 minutes, or until both sides are lightly golden brown and the centers are cooked through.

    If the muffins are browning too quickly, lower the heat.

    If they remain pale after several minutes and aren’t cooking properly, your pan may not be hot enough.

    Cooking a test muffin first is actually a useful trick. It lets you adjust the heat before committing the entire batch to the pan.

    The Mistake I Would Avoid: Turning Up the Heat

    One of the easiest mistakes with English muffins is assuming that a hotter pan will make them cook faster.

    It doesn’t always work that way.

    You can end up with a beautifully browned outside while the middle is still doughy.

    Medium heat gives the muffins enough time to develop a golden crust while the center cooks.

    If your first muffin looks too dark, don’t simply reduce the cooking time. Lower the heat and give the remaining muffins a slower cook.

    Another Common Mistake: Adding Too Much Flour

    When dough feels sticky, it is tempting to keep adding flour.

    I’ve found that this can easily go too far.

    A slightly soft dough is much easier to work with than a stiff dough that has been overloaded with flour. Add flour gradually and stop once the dough becomes soft, elastic, and manageable.

    Remember that you’ll also be working on a lightly floured surface, so some additional flour will naturally come into contact with the dough.

    How to Know When They Are Cooked

    The outside should be lightly browned rather than very dark.

    The muffins should also feel firm enough to handle without collapsing.

    Because the muffins are thick, color alone isn’t always a perfect indicator. If you’re unsure, cook one test muffin and split it open after it has cooled slightly.

    If the center looks wet or doughy, lower the heat and cook the next batch longer.

    This is much easier than trying to rescue an entire batch at the end.

    How to Split English Muffins

    For the best texture, don’t necessarily slice them perfectly smooth with a knife.

    English muffins are famous for their little nooks and crannies.

    Use a fork to gently pierce around the edge and pull the muffin apart.

    Then toast the two halves.

    The uneven surface catches melted butter, cream cheese, jam, or other toppings beautifully.

    My Favorite Ways to Serve Them

    These homemade English muffins are flexible enough for both sweet and savory breakfasts.

    Butter

    A warm toasted muffin with butter is probably the simplest option. The butter melts into all those little pockets inside.

    Orange Butter

    For something a little different, serve them with orange butter. The citrus flavor pairs particularly well with the lightly toasted crust.

    Cream Cheese and Jam

    Spread cream cheese over a toasted half and add your favorite jam.

    Strawberry, raspberry, blueberry, or apricot all work nicely.

    Breakfast Sandwiches

    Use the muffins instead of regular bread for breakfast sandwiches.

    Try:

    • Fried or scrambled eggs
    • Cheese
    • Cooked breakfast meat
    • Sliced tomato
    • Avocado
    • A little hot sauce

    The sturdy texture makes them particularly good for sandwiches.

    What If My Dough Isn’t Rising?

    Don’t panic immediately.

    Yeast dough can take longer when the room is cold.

    Give it more time and place the bowl somewhere comfortably warm.

    However, if you used water or milk that was extremely hot, the yeast may have been damaged.

    For future batches, aim for warm rather than hot liquid.

    Also check the expiration date of your yeast. Old yeast is one of those small things that can ruin an otherwise perfectly prepared dough.

    Can You Make the Dough Ahead?

    Yes, you can prepare parts of the process ahead to make breakfast easier.

    The easiest approach is to make the dough, allow it to rise, shape the muffins, and then plan the cooking around when you want to serve them.

    For longer storage, cooked muffins can be kept in a resealable plastic bag once completely cooled.

    Don’t seal them while they’re still hot. Trapped steam can make the surface damp and affect the texture.

    How to Store Leftover English Muffins

    Allow the muffins to cool completely before storing them.

    Place them in a resealable plastic bag and keep them at room temperature for short-term storage.

    For longer storage, freezing is a practical option.

    When you’re ready to eat one, let it thaw and then toast it. Toasting helps bring back the crisp exterior and warm interior that makes freshly cooked English muffins so good.

    English Muffin Troubleshooting

    My muffins are dark outside but raw inside.

    Your griddle is probably too hot.

    Lower the heat and cook them more slowly.

    My muffins are too dense.

    The dough may have needed more rising time, or too much flour may have been added.

    Next time, pay attention to the dough’s appearance rather than relying only on the timer.

    My dough is very sticky.

    Add flour gradually rather than dumping in a large amount.

    The dough should be soft but workable.

    My yeast isn’t foaming.

    Check that the water isn’t too hot or too cold and make sure your yeast is still active.

    My muffins stick to the pan.

    Make sure the griddle is lightly greased and that the muffins have enough cornmeal on their surfaces.

    Avoid moving them around constantly while they cook.

    A Few Practical Tips for Better Results

    Use medium heat. This is probably the single most useful cooking tip.

    Don’t rush the rising time. The dough needs time to develop its light texture.

    Measure flour carefully. Too much flour can make the muffins heavy.

    Cook one test muffin first. It gives you a chance to adjust the griddle temperature.

    Don’t skip the cornmeal. It contributes both texture and the classic English muffin feel.

    Let them cool before storing. This helps prevent condensation inside the storage bag.

    Toast them after splitting. That’s when the nooks and crannies really shine.

    Recipe at a Glance

    Prep Time: 25 minutes
    Cook Time: 20 minutes
    Additional Time: 1 hour 30 minutes
    Total Time: About 2 hours 15 minutes
    Yield: About 18 English muffins

    Ingredients

    • 1 cup milk
    • 2 tablespoons white sugar
    • 1 cup warm water
    • 1 packet active dry yeast
    • 6 cups all-purpose flour
    • ¼ cup melted shortening
    • 1 teaspoon salt
    • ¼ cup cornmeal, plus extra as needed

    Basic Method

    1. Warm the milk and dissolve the sugar.
    2. Let the milk cool to lukewarm.
    3. Mix warm water with yeast and let it stand for about 10 minutes.
    4. Combine the milk, yeast, flour, and shortening.
    5. Add salt and remaining flour to form a soft dough.
    6. Knead and let the dough rise until doubled.
    7. Roll to about ½-inch thickness.
    8. Cut into rounds.
    9. Dust with cornmeal and let them rise again for 30 minutes.
    10. Cook on a lightly greased griddle over medium heat.
    11. Cook about 10 minutes per side.
    12. Split, toast, and serve with your favorite toppings.

    Final Thoughts

    Homemade English muffins take a little more time than opening a package from the grocery store, but most of that time is simply the dough rising while you do something else.

    The actual hands-on work is straightforward.

    What I like most about this recipe is that it doesn’t require special equipment or unusual ingredients. A mixing bowl, rolling pin, cutter, and griddle are enough to get started.

    Once you’ve made a batch, try one while it’s still warm and toasted with butter. Then try cream cheese and jam. You’ll probably find yourself making them again—not because the recipe is complicated, but because a fresh homemade English muffin is simply hard to beat.