
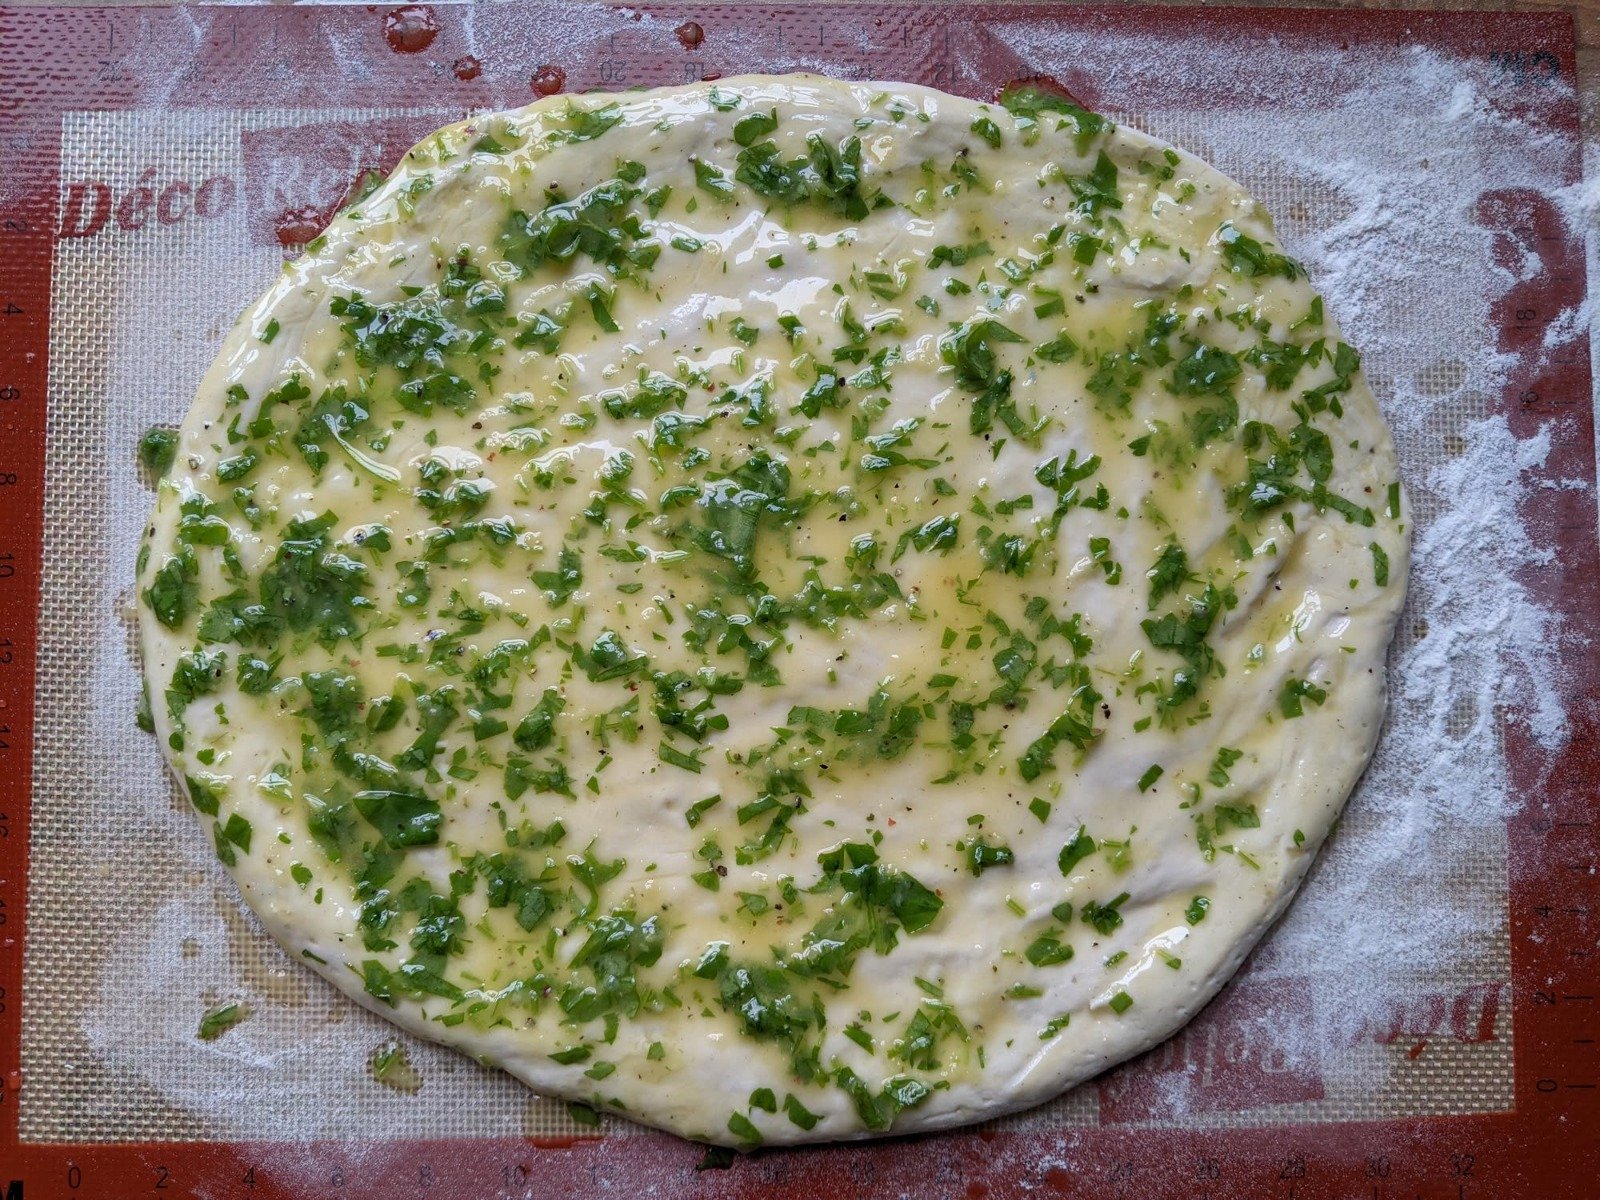
There is something special about warm garlic bread coming straight out of the oven. The edges are lightly crisp, the middle is soft, and the smell of garlic, butter, and fresh parsley fills the kitchen. It is the kind of side dish that can make a simple bowl of soup or a plate of pasta feel like a proper meal.
Making garlic pizza bread without gluten can be a little tricky, though. Regular pizza dough stretches easily because it contains gluten, while gluten-free dough often feels sticky, delicate, and harder to shape. If you have ever tried making gluten-free bread at home, you probably know that adding more flour seems like the easiest solution. Unfortunately, too much flour can leave the finished bread dry and crumbly.
This gluten-free garlic pizza bread recipe takes a different approach. It uses gluten-free flour, tapioca starch, yeast, and olive oil to create a softer base. A homemade garlic butter topping adds plenty of flavor without needing cheese or a long list of extra ingredients.
The result is a delicious garlic pizza bread that works beautifully as a side dish for pasta, soup, stews, or your next homemade pizza night.
Why You’ll Love This Gluten-Free Garlic Pizza Bread
There are plenty of reasons to keep this recipe handy, especially if you enjoy homemade bread but need to avoid gluten.
- Soft in the middle: Yeast helps the dough rise and creates a lighter texture.
- Crispy edges: Baking on a preheated tray encourages the bottom to cook properly.
- Simple garlic butter: Butter, olive oil, garlic, and parsley provide a classic savory flavor.
- No xanthan gum required in this recipe: Tapioca starch helps improve the dough’s flexibility and binding.
- Easy to customize: Add grated cheese, Italian herbs, or a pinch of chili flakes if you want a different flavor.
- A useful side dish: Serve it with tomato soup, lasagne, pasta, or a homemade dip.
You don’t need a pizza oven or specialist baking equipment. A regular kitchen oven, mixing bowl, measuring jug, and baking paper are enough to get started.
Recipe Overview
| Detail | Information |
|---|---|
| Preparation time | 50 minutes |
| Cooking time | 12 minutes |
| Total time | 1 hour 2 minutes |
| Servings | 2–3 as a side |
| Oven temperature | 220°C fan |
| Main ingredients | Gluten-free flour, tapioca starch, yeast, garlic, butter |
| Dietary notes | Gluten-free; dairy-free option available |
Preparation time includes the time needed for the dough to rise. Your exact timing may vary depending on the temperature of your kitchen and how quickly your yeast activates.
Ingredients for Gluten-Free Garlic Pizza Bread
The ingredients are divided into two groups: the pizza bread base and the garlic butter topping.
For the dough
- 170g gluten-free plain flour
- 50g tapioca starch, also sold as tapioca flour
- 8g dried active yeast labeled gluten-free
- 160ml warm water
- 1.5 teaspoons caster sugar
- 1 teaspoon fine salt
- 1.5 tablespoons olive oil
- A little extra gluten-free flour for shaping
A gluten-free plain flour blend suitable for bread or pizza is a good starting point. Different blends absorb water differently, so the texture can vary slightly between brands.
Tapioca starch is particularly helpful because it gives the dough more flexibility than many gluten-free flour blends can provide on their own.
For the garlic butter topping
- 40g salted butter
- 10ml olive oil
- 2 garlic cloves
- 10g fresh parsley or 2 teaspoons dried parsley
- Salt and black pepper, to taste
Fresh garlic gives the topping a stronger, fresher flavor. If you prefer a milder taste, use one large clove instead of two.
For a dairy-free version, replace the butter with a suitable dairy-free spread or olive oil. Check the ingredient labels on all packaged products to ensure they meet your dietary requirements.
How to Make Gluten-Free Garlic Pizza Bread
Follow these steps in order, paying particular attention to the yeast, dough consistency, and oven temperature. Those three details make a noticeable difference to the finished bread.
Step 1: Activate the yeast
Pour the warm water into a measuring jug. Add the caster sugar and dried active yeast, then stir gently to combine.
Leave the mixture undisturbed for about 10–15 minutes.
Look for a layer of foam forming on the surface. This is a useful sign that the yeast is active and ready to use.
The water should feel comfortably warm rather than hot. Water that is too hot can damage the yeast, while very cold water may slow its activity.
If there is no foam after the resting period, check the yeast’s expiry date and make sure the water temperature was appropriate. It is better to solve this problem before mixing the dough than to discover later that the bread has barely risen.
Step 2: Mix the dry ingredients
Take a large mixing bowl and add the gluten-free plain flour, tapioca starch, and salt.
Stir thoroughly with a wooden spoon or whisk so that the ingredients are evenly distributed.
Add the olive oil and mix it through the flour mixture.
Combining the dry ingredients first helps prevent small pockets of salt or starch from remaining in the finished dough.
Step 3: Make the gluten-free dough
Pour the activated yeast mixture into the bowl, including the foamy liquid.
Use a sturdy spatula or wooden spoon to mix everything together until you have a thick, sticky dough.
Do not expect it to look exactly like traditional wheat-based pizza dough. Gluten-free dough behaves differently because it does not have the same gluten network to provide stretch and structure.
The mixture should be soft and moist, somewhere between a conventional dough and a thick paste. It may pull away from the sides of the bowl slightly as you stir, but it will probably remain stickier than you expect.
A common mistake is adding too much flour at this stage. Resist the temptation to keep adding flour simply because the mixture sticks to your spoon. Too much flour can make the bread firmer and less pliable after baking.
If you have a kitchen scale, use it to measure the ingredients accurately. Small changes in flour or water can affect the consistency.
Step 4: Let the dough rise
Cover the bowl with a clean tea towel and leave it in a warm, draft-free place for approximately 30–40 minutes.
During this time, the yeast produces gas that helps the dough expand. Depending on the room temperature and the condition of the yeast, the dough may rise faster or more slowly.
Look for a noticeable increase in volume rather than relying only on the clock.
If your kitchen is cool, give the dough a little extra time. Avoid placing the bowl somewhere excessively hot in an attempt to speed things up.
Step 5: Preheat the oven and baking tray
Towards the end of the rising time, preheat your oven to 220°C fan.
Place a large oven-safe baking tray on the middle shelf while the oven heats.
A hot tray helps the base begin cooking as soon as it enters the oven. This can encourage a better bottom crust and reduce the chance of a pale, soft underside.
Make sure your baking paper or silicone baking mat is suitable for the temperature specified by its manufacturer.
Step 6: Shape the pizza bread
Place a silicone baking mat or a large sheet of non-stick baking paper on your work surface.
Dust it generously with gluten-free flour. Keep some additional flour nearby for your hands and the top of the dough.
Carefully turn the dough out onto the prepared surface. Use a spatula to collect any mixture remaining in the bowl.
Dust the top lightly and flour your hands before gently pressing the dough into a round, oval, or rectangular shape.
Aim for a thickness of approximately 5mm for a relatively thin garlic pizza bread. You can leave it thicker if you prefer a softer, breadier centre, although the cooking time may need to be adjusted.
If the dough sticks to your fingers, lightly wet your hands instead of repeatedly adding flour. This small adjustment can make shaping much easier.
Try to keep the thickness reasonably even. Very thin edges may brown before the centre is fully cooked.
Step 7: Prepare the garlic butter
Leave the shaped base to rest for about five minutes while you prepare the topping.
Melt the salted butter in a microwave-safe bowl using short intervals. Alternatively, melt it gently in a small saucepan.
Add the olive oil, finely minced or grated garlic, and a little black pepper. Add salt only if needed, since salted butter already contains salt.
Finely chop the fresh parsley and stir it into the mixture. If using dried parsley, mix it in directly.
The olive oil helps loosen the butter so it can be brushed across the surface more easily.
Step 8: Brush the topping over the dough
Use a silicone pastry brush to spread the garlic butter evenly over the shaped base.
Cover the middle and the edges, taking care not to leave large pools of butter in one place.
For a stronger garlic flavor, make sure the finely chopped garlic is distributed across the bread rather than concentrated in one area.
If you enjoy a little heat, add a small pinch of chili flakes. For a cheesy version, you can also sprinkle a modest amount of grated mozzarella or Parmesan-style cheese over the top, provided it suits your dietary needs.
Step 9: Bake until golden
Carefully remove the hot baking tray from the oven.
Keeping the dough on its baking mat or baking paper, slide it onto the hot tray. Use oven gloves and take care not to touch the tray’s surface.
Return the tray to the oven and bake for approximately 12 minutes.
The bread should puff up slightly, with lightly golden edges and a cooked centre. Depending on the thickness of the base and your oven, it may need a little more time.
If the edges are browning too quickly while the middle still looks undercooked, check your oven temperature and allow the bread to finish baking without increasing the heat.
Let the bread rest briefly before cutting it into slices or strips.
Serve while warm, when the garlic aroma is at its best and the edges are still pleasantly crisp.
What Should Gluten-Free Pizza Dough Feel Like?
This is one of the most important parts of the recipe.
Gluten-free dough often feels much wetter than conventional pizza dough. That does not automatically mean something has gone wrong.
Wheat flour forms an elastic gluten network when mixed with water. Gluten-free flour blends rely on different ingredients and starches, so their texture can be softer, stickier, and less elastic before baking.
Tapioca starch helps improve the flexibility of this particular dough.
Here is a simple guide to what you should expect:
- Too sticky to handle: Lightly flour the work surface and your hands, or use slightly damp hands.
- Very stiff mixture: Double-check the flour and water measurements before adding anything else.
- No visible rise: Check whether the yeast was active and whether the dough had enough time in a suitably warm place.
- Crumbly finished bread: Excess flour, insufficient moisture, or an unsuitable flour blend may be responsible.
The goal is not to create a perfectly smooth ball of dough. It is to make a moist mixture that can be shaped gently and becomes more stable as it bakes.
Why Tapioca Starch Matters
Tapioca starch is made from cassava root and is commonly used in gluten-free baking.
In this recipe, it helps create a more flexible texture and supports the structure of the bread. Gluten-free bases can sometimes crack when shaped or become crumbly after baking, so adding a suitable starch can help improve the result.
Tapioca starch is also called tapioca flour in many shops. However, it is not the same as every product labeled gluten-free flour, so check the packaging before substituting it.
This recipe does not require added xanthan gum. That is useful for people who prefer to avoid it, although results will still depend on the particular flour blend and the accuracy of the measurements.
Common Mistakes to Avoid
Even a fairly simple bread recipe can produce disappointing results when a few small details are overlooked.
1. Using water that is too hot
Hot water can damage yeast and prevent the dough from rising properly.
Use comfortably warm water and follow the yeast packet’s instructions for activation.
2. Adding extra flour too quickly
A sticky mixture is normal for this gluten-free dough. Adding too much flour can reduce moisture and make the finished bread dense.
Use flour mainly for shaping rather than changing the entire dough consistency without a clear reason.
3. Skipping the rising time
Yeast needs time to work. Baking the dough immediately after mixing will usually produce a different texture from allowing it to rise first.
Give it approximately 30–40 minutes, or until it has expanded noticeably.
4. Forgetting to preheat the tray
Starting with a cold tray may affect how the base cooks underneath.
Preheating the tray helps the bottom begin setting as soon as the bread enters the oven.
5. Spreading the dough unevenly
A base with thick and thin patches may bake unevenly. Some areas can become crisp while thicker sections remain soft.
Take an extra minute to shape the dough to a reasonably consistent thickness.
6. Leaving the garlic butter in large pools
Too much butter in one spot can make the surface greasy and distribute the garlic unevenly.
Brush the topping across the whole base in a thin, even layer.
Can You Make This Recipe Dairy-Free?
Yes. The dough itself contains no dairy ingredients, so the main adjustment is the topping.
Replace the 40g butter with a dairy-free spread suitable for melting, or use olive oil instead.
A dairy-free spread gives a result closer to traditional garlic butter. Olive oil creates a lighter, more Mediterranean-style topping.
Check that the selected spread is genuinely dairy-free, as ingredients vary between brands.
Easy Ways to Customize Your Garlic Pizza Bread
Once you have mastered the basic recipe, there are several ways to change the flavor without making the method complicated.
Cheesy garlic bread: Add grated mozzarella or another cheese that melts well. For strict gluten-free cooking, check that all ingredients are suitable.
Herb garlic bread: Combine parsley with a little dried oregano or Italian seasoning.
Spicy garlic bread: Add chili flakes or a small pinch of cayenne pepper to the topping.
Extra-garlicky bread: Add another clove of garlic if you enjoy a stronger flavor. Be careful not to burn the garlic, as it can become bitter.
Olive and herb version: Add a few finely chopped olives and dried herbs for a more savory topping.
Dipping strips: Shape the dough into a rectangle and cut the finished bread into strips. This works particularly well when serving several people with soup or dips.
If you add cheese or other toppings, remember that the extra ingredients may affect browning and cooking time.
What to Serve with Gluten-Free Garlic Pizza Bread
This bread is versatile enough to accompany several everyday meals.
- Tomato soup: The crisp edges are perfect for dipping into a warm bowl of tomato soup.
- Pasta dishes: Serve alongside spaghetti, creamy mushroom pasta, or tomato-based pasta.
- Lasagne: Garlic pizza bread makes a satisfying side for a hearty lasagne.
- Shakshuka: Use small pieces to scoop up the tomato and egg mixture.
- Salads: Pair it with a fresh green salad for a simple lunch.
- Dips: Serve with tomato salsa, a suitable garlic dip, or a homemade herb dip.
If you are serving someone with coeliac disease, take care with shared utensils, chopping boards, trays, and other possible sources of gluten cross-contact.
Can You Prepare the Dough in Advance?
For the best texture, this recipe is easiest to prepare and bake on the same day.
You can measure the dry ingredients and prepare the garlic topping in advance, keeping them separate until you are ready to make the bread.
If you need to prepare the dough ahead, follow a tested storage method for yeast-based gluten-free dough rather than assuming that any overnight rise will work. Different flour blends and yeast formulations can behave differently during extended refrigeration.
For convenience, the bread can also be baked ahead and reheated briefly in the oven. The edges may lose some crispness during storage, but gentle reheating can help restore it.
How to Store Leftovers
Allow leftover bread to cool, then place it in an airtight container.
Refrigerate it promptly and use it within a few days, following normal food-safety guidance for cooked foods. Gluten-free bread can dry out more quickly than expected, so avoid leaving it uncovered.
To reheat, place the pieces in a preheated oven until warmed through. A short reheating period is usually better than leaving them in for too long, which can make the bread hard.
For longer storage, freeze the cooled bread in a freezer-safe container or bag, separating individual pieces with baking paper if necessary. Reheat from frozen or thaw first, following an appropriate method for the size of the pieces.
Frequently Asked Questions
Is gluten-free garlic pizza bread difficult to make?
Not particularly. The main difference is that the dough is stickier and less elastic than traditional pizza dough. Once you understand that this texture is normal, shaping becomes much easier.
Why didn’t my gluten-free dough rise?
Possible reasons include inactive yeast, water that was too hot, a cold kitchen, or insufficient rising time. Check the yeast before mixing and allow the dough to rest somewhere comfortably warm.
Can I use regular plain flour instead of gluten-free flour?
Regular wheat flour will change the recipe’s structure and hydration requirements. This recipe is designed around gluten-free flour and tapioca starch, so a direct substitution is not recommended.
Can I leave out the tapioca starch?
You can experiment with other gluten-free starches, but the texture may change. Tapioca starch contributes to the flexibility that makes this particular base easier to shape.
Can I make the bread without yeast?
This exact recipe relies on yeast for its rise and texture. For a yeast-free alternative, use a separately tested gluten-free flatbread recipe and add the garlic butter topping.
Can I use dried parsley instead of fresh parsley?
Yes. Use approximately 2 teaspoons of dried parsley in place of 10g fresh parsley. The flavor will be slightly different, but dried parsley is a convenient pantry alternative.
How do I know when the bread is ready?
Look for lightly golden edges, a slightly puffed surface, and a cooked centre. Twelve minutes is the starting point for this recipe, but ovens and dough thickness can affect the final baking time.
Is this recipe suitable for someone with coeliac disease?
It can be prepared using gluten-free ingredients, but the ingredients alone are not enough to guarantee a safe meal. Check product labels and prevent cross-contact with wheat flour, shared utensils, baking surfaces, and contaminated equipment.
Final Thoughts
Homemade gluten-free garlic pizza bread is worth the little bit of extra attention it requires. The dough may feel unfamiliar at first, especially if you are used to stretching regular pizza dough, but there is no need to fight its sticky texture.
Measure the ingredients carefully, give the yeast time to work, and use lightly floured or damp hands when shaping. A hot oven and an even coating of garlic butter help bring everything together.
The best part is how easily this bread fits into an ordinary meal. Serve it with soup for lunch, add it to pasta night, or cut it into strips for sharing with your favorite dip.
Once you are comfortable with the basic method, try different herbs, a little cheese, or a dairy-free topping to make it your own.
Printable Recipe Card
Gluten-Free Garlic Pizza Bread
Yield: 2–3 side servings
Prep time: 50 minutes
Cook time: 12 minutes
Total time: 1 hour 2 minutes
Oven: 220°C fan
Ingredients
For the base
- 170g gluten-free plain flour
- 50g tapioca starch
- 8g dried active yeast labeled gluten-free
- 160ml warm water
- 1.5 teaspoons caster sugar
- 1 teaspoon fine salt
- 1.5 tablespoons olive oil
- Extra gluten-free flour for dusting
For the topping
- 40g salted butter
- 10ml olive oil
- 2 garlic cloves, minced
- 10g fresh parsley or 2 teaspoons dried parsley
- Salt and black pepper, to taste
Method
- Mix the warm water, caster sugar, and yeast. Leave for 10–15 minutes until foamy.
- Combine the gluten-free flour, tapioca starch, and salt in a large bowl. Stir in the olive oil.
- Add the yeast mixture and mix until a thick, sticky dough forms.
- Cover and leave in a warm place for 30–40 minutes, or until noticeably risen.
- Preheat the oven to 220°C fan with a large baking tray inside.
- Transfer the dough to a well-floured baking mat or baking paper. Shape it into a round, oval, or rectangle approximately 5mm thick.
- Rest for five minutes while preparing the topping.
- Melt the butter and mix with the olive oil, garlic, parsley, salt, and pepper.
- Brush the garlic butter evenly over the dough.
- Carefully transfer the bread on its baking mat or paper to the hot tray.
- Bake for approximately 12 minutes, until puffed and lightly golden.
- Rest briefly, slice, and serve warm.
Recipe tip: Keep the dough moist. Adding too much flour is one of the easiest ways to make gluten-free pizza bread less soft and flexible.
