The first time I made sourdough bread, I felt like I was studying for an exam.
Every guide seemed to have a long list of rules. Feed the starter at exactly the right time. Autolyse the flour. Stretch and fold every thirty minutes. Watch the dough temperature. Preheat the Dutch oven for an hour. Then cross your fingers and hope the loaf actually rises.
For a while, I followed every step because I thought that was the only way to make good sourdough.
Then one weekend, mostly out of laziness and curiosity, I tried something different.
My sourdough starter had been sitting in the refrigerator for days. I hadn’t fed it. I didn’t feel like spending the entire day babysitting dough. Instead, I mixed everything together, left it alone, shaped it later, and baked it in a cold Dutch oven.
I expected an average loaf.
What came out of the oven surprised me.
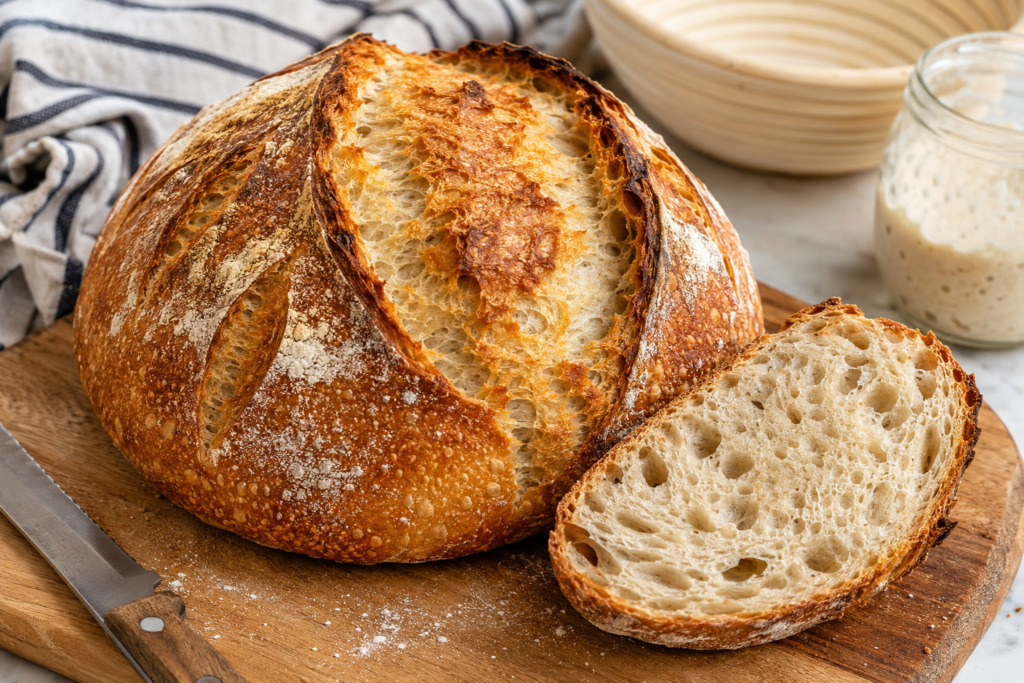
The crust was golden and crackly. The loaf had a beautiful rustic shape. It opened nicely where it was scored, and the inside was soft and airy enough to make excellent sandwiches and toast.
That experience completely changed how I think about homemade sourdough.
This approach is often called the “Unloaf Method,” and it’s perfect for people who want great bread without turning baking into a full-time hobby.
Why Traditional Sourdough Feels So Complicated
There is nothing wrong with traditional sourdough methods.
Many experienced bakers enjoy the process. The folding schedules, hydration calculations, and fermentation timing can be rewarding.
The problem is that many beginners see these techniques and assume sourdough is too difficult.
I’ve talked to several friends who wanted to bake sourdough but never started because the instructions felt overwhelming.
They saw pages of steps and immediately decided it wasn’t worth the effort.
The Unloaf Method removes much of that pressure.
Instead of trying to achieve perfection, the focus is on making delicious homemade bread using a process that fits into real life.
What Is the Unloaf Method?
The Unloaf Method is a simplified approach to sourdough baking.
Rather than following every traditional step, you use a healthy but unfed sourdough starter directly from the refrigerator, mix the dough all at once, allow it to rise, shape it, proof it, and bake it.
There are no scheduled folds.
No autolyse period.
No overnight cold fermentation.
No blazing-hot Dutch oven.
The dough goes into a cold Dutch oven, which goes into a cold oven. The oven heats gradually while the bread bakes.
The first time I tried this, I honestly thought the loaf would come out flat.
Instead, the gradual heating produced excellent oven spring and a surprisingly crisp crust.
The biggest benefit wasn’t even the bread itself.
It was how relaxed the entire process felt.
Why Home Bakers Love This Method
After making this loaf several times, I noticed a few reasons why it has become so popular among home bakers.
Less Planning
Traditional sourdough often requires planning your day around the dough.
With the Unloaf Method, you simply mix the ingredients and let time do most of the work.
No Hot Dutch Oven
If you’ve ever tried lowering delicate dough into a scorching-hot Dutch oven, you know how stressful it can be.
A cold Dutch oven eliminates that problem completely.
Great for Busy Schedules
Work, family responsibilities, errands, and unexpected interruptions happen.
This method is forgiving enough to fit around a normal day.
Beginner Friendly
Many new bakers quit because they think they are doing everything wrong.
The Unloaf Method removes several intimidating steps while still producing impressive results.
Ingredients You’ll Need
One reason I keep returning to this recipe is its simplicity.
You only need four ingredients.
Unfed Sourdough Starter
The star of the recipe.
The starter doesn’t need to be freshly fed. It can come directly from the refrigerator as long as it’s healthy and active.
If your starter smells pleasantly tangy or yeasty, you’re usually good to go.
If it smells spoiled or shows signs of mold, discard it and refresh your culture.
Bread Flour
Bread flour provides strength and structure.
Because this method skips folding techniques, the additional protein in bread flour helps support the loaf.
Water
Room-temperature water works perfectly.
If your kitchen is particularly cold, slightly warm water can help encourage fermentation.
Salt
Never underestimate salt.
Besides flavor, it strengthens the dough and improves the overall texture of the finished bread.
Ingredient Measurements
For one round loaf:
- 250 grams unfed sourdough starter
- 350 grams water
- 500 grams bread flour
- 10 grams fine sea salt
If you are completely new to sourdough and nervous about handling sticky dough, reduce the water to around 325 grams.
The dough will be easier to manage.
How to Make the Unloaf Sourdough Bread
Step 1: Mix Everything Together
Add the starter and water to a large bowl.
Stir until the starter loosens into the water.
Add the flour and salt.
Mix until there are no dry patches remaining.
At this stage, the dough will look rough and shaggy.
Don’t worry.
Mine always looks messy at first.
Cover the bowl and move on with your day.
Step 2: Let the Dough Rise
Leave the dough at room temperature for approximately 6 hours and 20 minutes.
The exact time depends on your kitchen temperature and the strength of your starter.
During this stage, you’ll notice the dough becoming puffier and lighter.
Small bubbles may appear on the surface.
One lesson I learned early is not to obsess over the clock.
The dough tells you more than any timer can.
If it still looks dense, give it more time.
If it’s bubbly and lively, move to the next step.
Step 3: Shape the Dough
Lightly flour your countertop.
Turn the dough out gently.
Fold the edges toward the center and create a rough round shape.
Then tighten the surface by gently dragging the dough across the counter.
This creates tension on the outside of the loaf, helping it hold its shape during baking.
Don’t chase perfection.
Rustic bread is supposed to look rustic.
Step 4: Proof the Dough
Place the shaped dough into a well-floured banneton basket.
No banneton?
No problem.
I’ve successfully used a mixing bowl lined with a heavily floured kitchen towel.
Let the dough proof for 45 minutes to 90 minutes.
A gentle poke test helps here.
Press lightly with a floured finger.
If the indentation slowly springs back, it’s ready.
Step 5: Transfer to a Cold Dutch Oven
Place parchment paper over the banneton.
Carefully flip the dough onto it.
Score the top using a bread lame or a sharp knife.
Transfer the dough and parchment directly into a cold Dutch oven.
Put the lid on.
This step still feels strange to me because years of baking advice taught me to preheat everything.
Yet it works surprisingly well.
Step 6: Bake from a Cold Oven
Place the covered Dutch oven into a cold oven.
Set the temperature to 450°F (232°C).
Bake for 1 hour with the lid on.
Remove the lid.
Bake for another 10 minutes until the crust reaches the color you prefer.
The bread is done when it sounds hollow when tapped on the bottom or reaches an internal temperature between 205°F and 210°F.
Allow it to cool completely before slicing.
I know that’s difficult.
Fresh bread smells incredible.
But cutting too early can make the interior gummy.
Common Mistakes to Avoid
Using a Weak Starter
An unfed starter can work beautifully.
A neglected starter usually won’t.
Your starter should still be healthy and active overall.
Rushing the Rise
Many sourdough problems come from under-fermentation.
If the dough hasn’t visibly expanded, give it more time.
Forgetting to Flour the Banneton
A sticky dough can cling to the basket and deflate when removed.
Generous flour prevents frustration later.
Cutting the Bread Too Soon
This is probably the mistake I’ve made most often.
The loaf continues setting internally as it cools.
Waiting at least an hour makes a noticeable difference.
What the Finished Loaf Is Like
People often assume a simplified method means lower-quality results.
That hasn’t been my experience.
The crust develops a rich golden color with satisfying crunch.
The crumb is soft with an irregular, rustic structure.
The flavor remains pleasantly tangy and complex, just as you’d expect from sourdough.
Will it look exactly like a competition-level artisan loaf made by a professional baker?
Probably not.
Will it produce a delicious homemade loaf that your family happily devours?
Absolutely.
Who Should Try the Unloaf Method?
This method is ideal for:
- Beginners learning sourdough
- Busy parents
- Working professionals
- Casual home bakers
- Anyone overwhelmed by traditional sourdough techniques
It’s also great for experienced bakers who occasionally want fresh bread without spending the entire day managing dough.
Final Thoughts
The biggest lesson this loaf taught me is that homemade bread doesn’t have to be complicated to be good.
For years, I believed every sourdough loaf required strict schedules, endless folding, and perfect timing.
Then a simple experiment with an unfed starter and a cold Dutch oven proved otherwise.
The Unloaf Method won’t replace every traditional sourdough technique, and it doesn’t need to.
What it does offer is something many home bakers are looking for: a practical way to bake beautiful sourdough bread without feeling tied to a complicated routine.
Sometimes the easiest method is the one that actually gets used, and that’s exactly why this loaf has earned a permanent place in my kitchen.